I “grew up” with computers. My Dad was a tech geek, and I married a tech geek, and frankly, I’m a tech geek. We’ve always been early and eager adopters of technology. So copying files, managing directories and other computer skills are second nature to me. I know, however, that is not the case for everyone. I have several friends and family members who struggle trying to get their embroidery designs from the source — whether it’s an email, a download, a USB stick or a CD — to their embroidery machine. So I thought I’d use this blog to give some directions on how to transfer embroidery designs to your machine.
Sources
Compact Disc (CD)
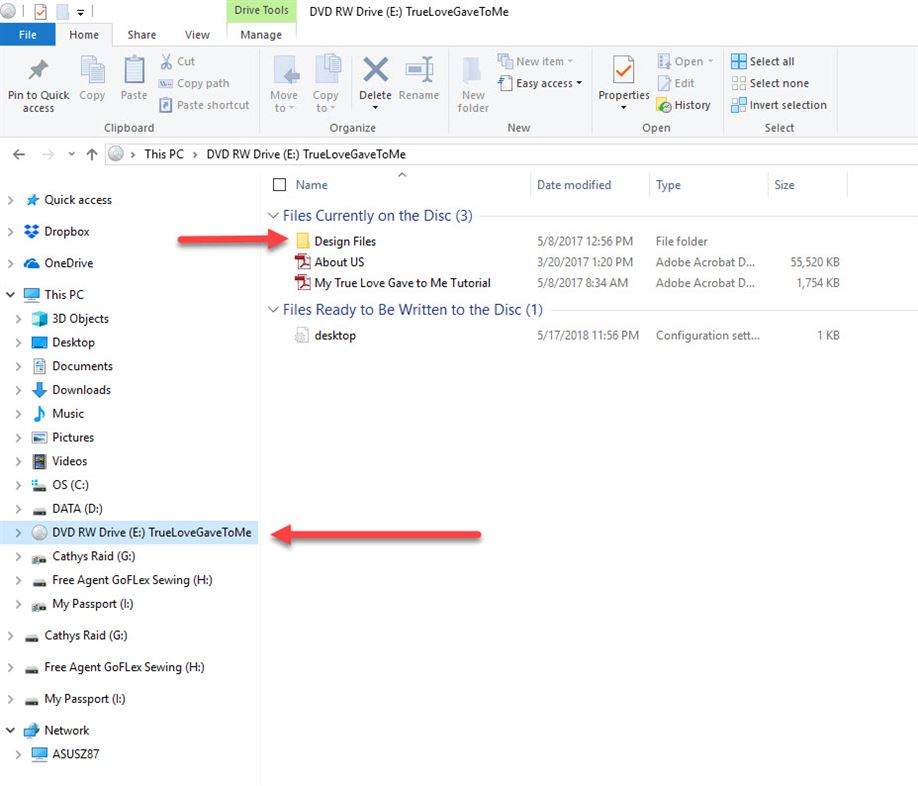
The most common way that you get designs is on a CD. If you are a member of Anita Goodesign’s All Access, then you get a CD every month chocked full of designs. If you buy design collections from OESD, KimberBell, Dakota Collectibles, Amazing Designs, etc., the designs are likely on a CD. (Of course, more and more designs are available online, and I’ll cover that later in this blog.)
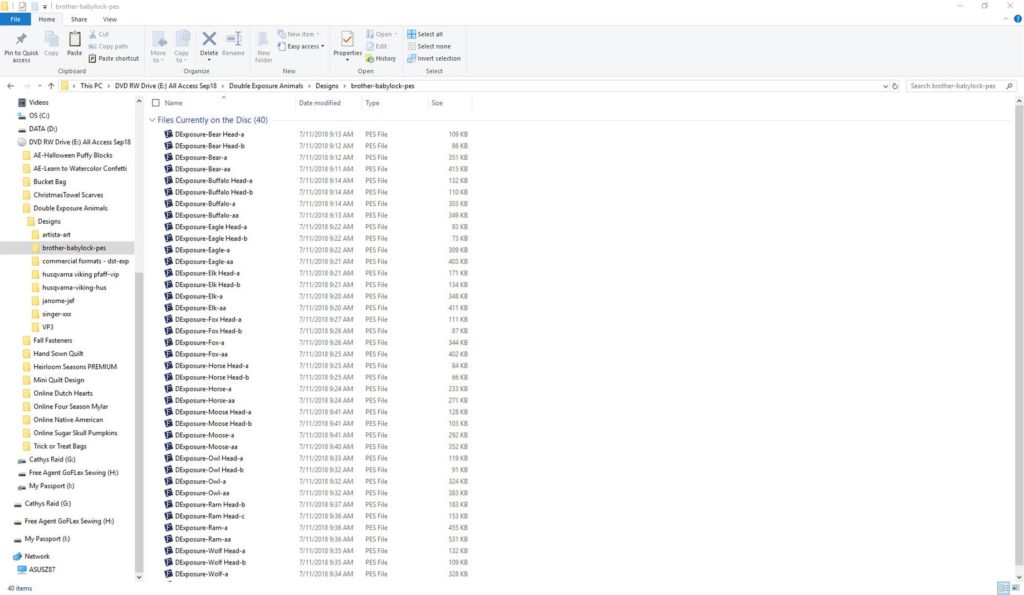
Anita Goodesign All Access CD
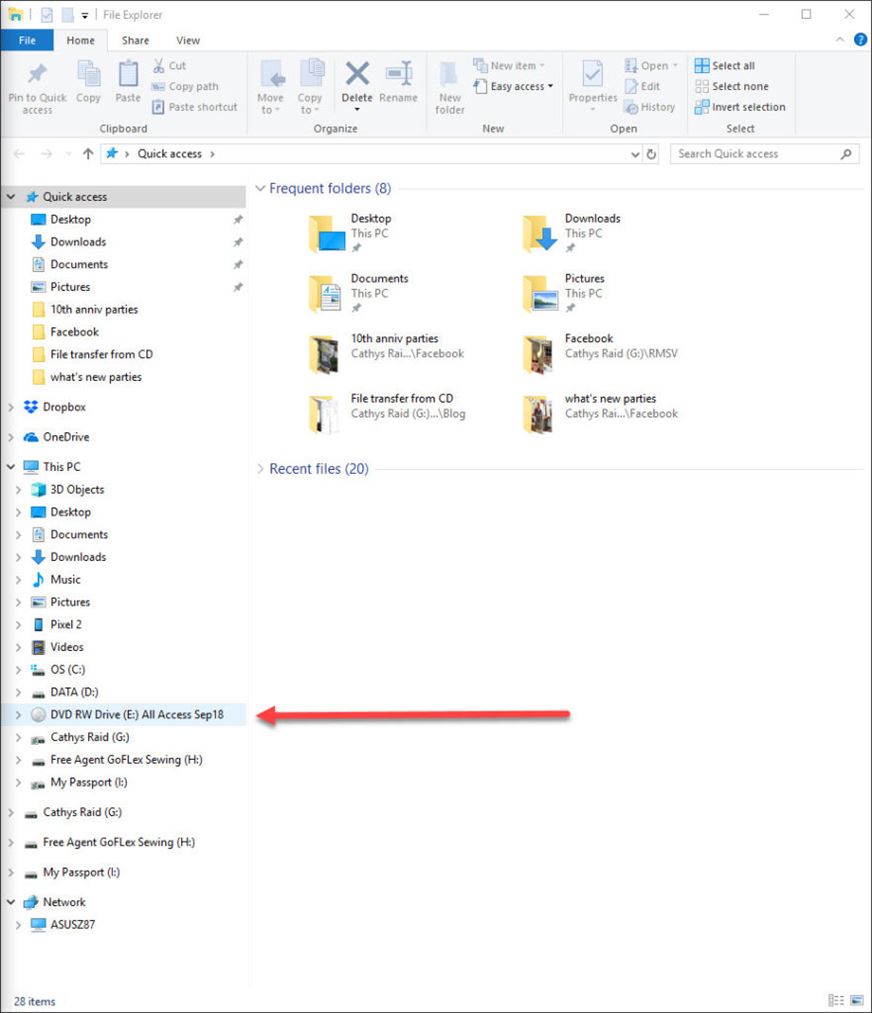
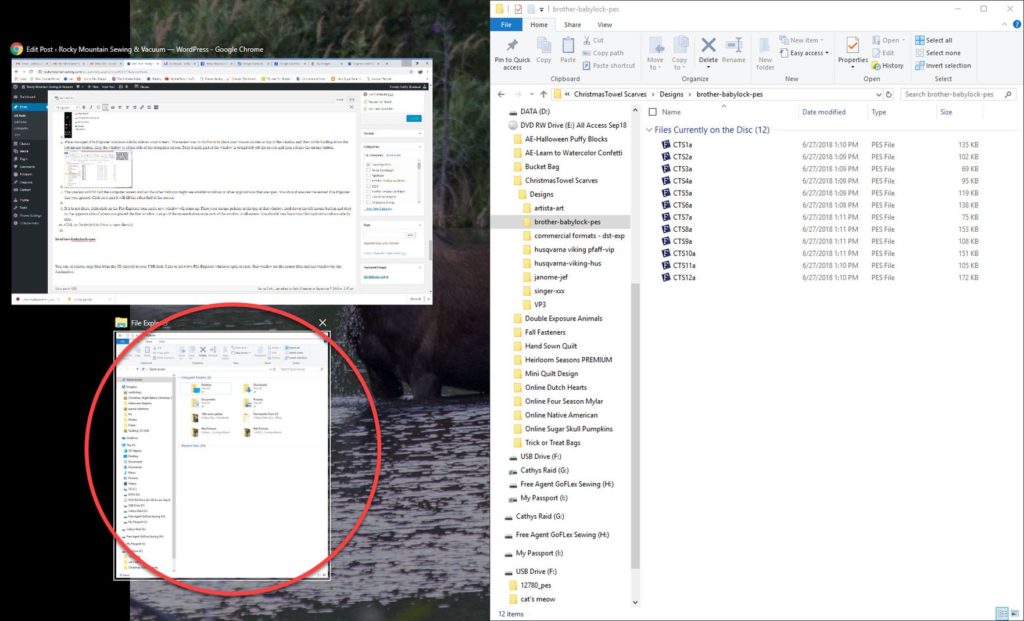
In order to view the designs on a CD, open File Explorer (formally known as File Manager).
To do this, right click on the file folder icon (circled in red) in the Windows Taskbar. Once you right click, select File Explorer from the drop down menu.
![]()
This will open a File Explorer window.
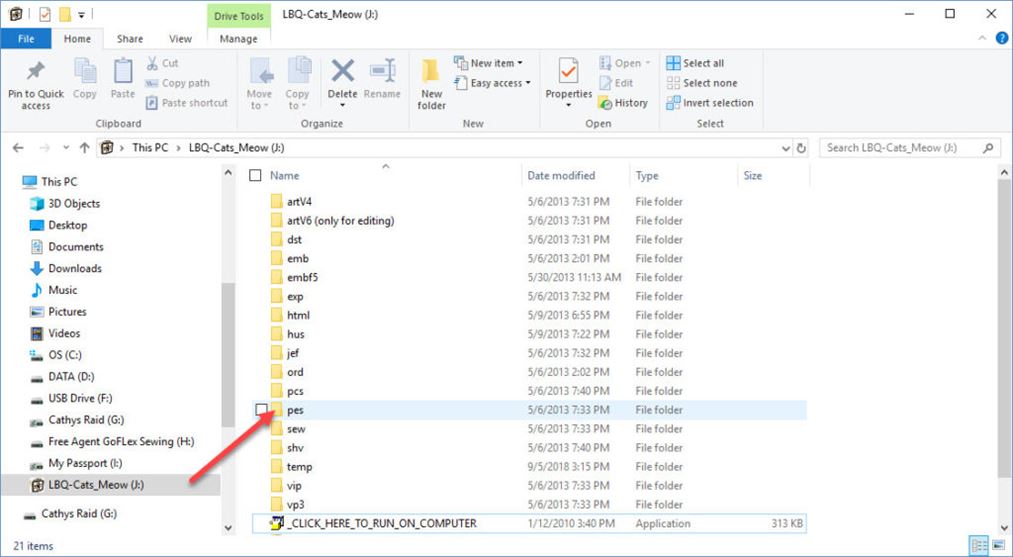
Find the DVD drive with your source CD in it.
Click on the DVD drive and you’ll see the contents of the DVD.
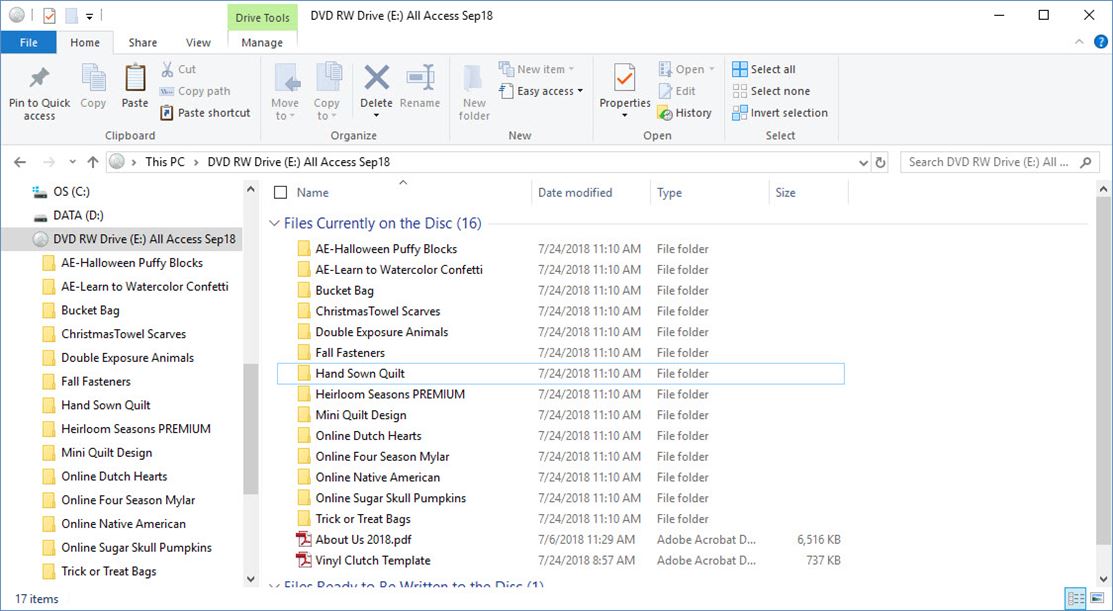
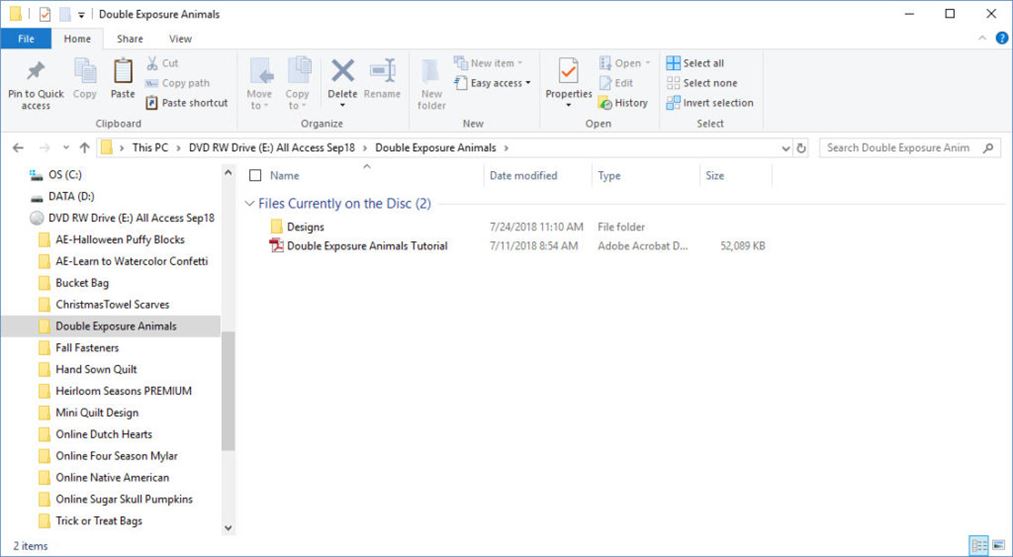
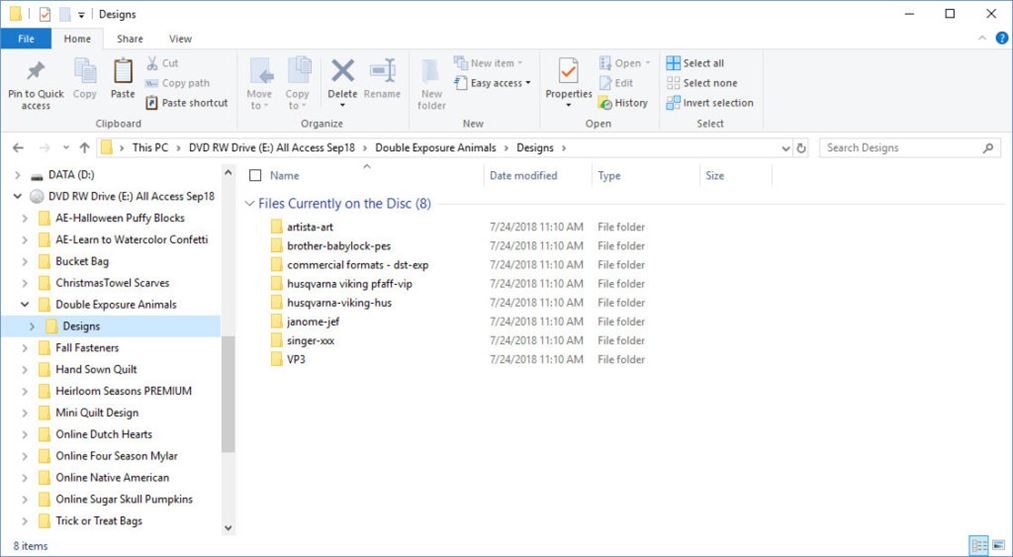
Each collection is in a separate folder. In the collection folder (i.e. Double Exposure Animals) is a the sew out tutorial and a “Designs” folder with sub folders for different machine formats. Click on any of the machine format folders to see a list of the individual designs.
Single Collection CDs
Of course, you can buy a CD of any of the Anita Goodesign collections without being an All Access member. We stock many of the collections in our stores, and can order one for you if we don’t have it in stock. The file structure on the individual collections is the same as it is for those collections on the All Access CD.
Other Collections
Other suppliers of embroidery designs will have different folder structures, but all of them will specify the machine type the designs go with. Some older design collections have an executable file when the CD was loaded that prompts you to pick a machine format and destination for the embroidery files.
Other Sources
USB Stick
We’re seeing more and more vendors provide embroidery designs on USB sticks these days. This is great because you could use the stick directly in your machine. You simply need to find the directory specific for your machine, open it and select your design.
The drawback to using the USB stick directly is that all formats are on the stick and may slow loading the designs down. Also, the USB stick is your only copy of the designs, so be sure to make a backup or copy the designs to your PC.
Online Download
You can purchase and download designs from online retailers. While many offer individual designs for purchase, others want you to download an entire collection. If you purchase more than one design, odds are the designs will be “zipped” into a single file for download. They will have to be extracted from the zip file before use. Individual designs may or may not be zipped, it depends on the vendor.
If you purchase designs online, some vendors will send you the designs by email. As with the Online Download, often these designs are compressed into a “zip” file and will need to be extracted before you can use them.
The Destination
USB Stick
Most newer embroidery machines use a USB stick or perhaps an SD card to read the embroidery designs. If you have a really old machine, your machine may take a small card or even a floppy disk. (If that’s the case, think about upgrading!) At any rate, unless you are using designs built into the machine, you have to get designs loaded onto the media that your machine uses. For the sake of this blog, I am going to use the USB stick as the destination for the designs to use in your machine.
I recommend using a USB stick that is 4gb or less in size. Some machines won’t even read sticks with greater than 8gb capacity. However, even if they do, larger sticks with tons of designs take longer to load into the embroidery machine. The stitch files for the embroidery machine are relatively small (usually less than 500kb), so you can put a lot of designs on a 2gb USB stick. We sell cute sewing – themed USB sticks in 2 and 4 gb sizes. We also have a 2gb stick with our 10 year logo at a great price in our stores.
Note: I highly recommend that you copy the directories and needed embroidery files to your computer hard drive to make it easier to load to your machine as you are ready to embroider them. Check out my previous blog, How to Organize and Manage Embroidery Collections, to see some suggestions on how to manage your embroidery collections. For this blog, I’m just going to illustrate what it takes to get your designs on a USB stick to use in your machine.
Transfer Files From Source to USB Stick
From a CD
Since I have Brother embroidery machines, and it’s time to make Christmas gifts, I’ll copy the designs that are in the Christmas Towel Scarves collection to a USB stick for my machine.
Open File Explorer Windows
- Place source CD into the DVD/CD drive on your PC.
- Open a File Explorer window by clicking on the File Explorer icon on your desktop.

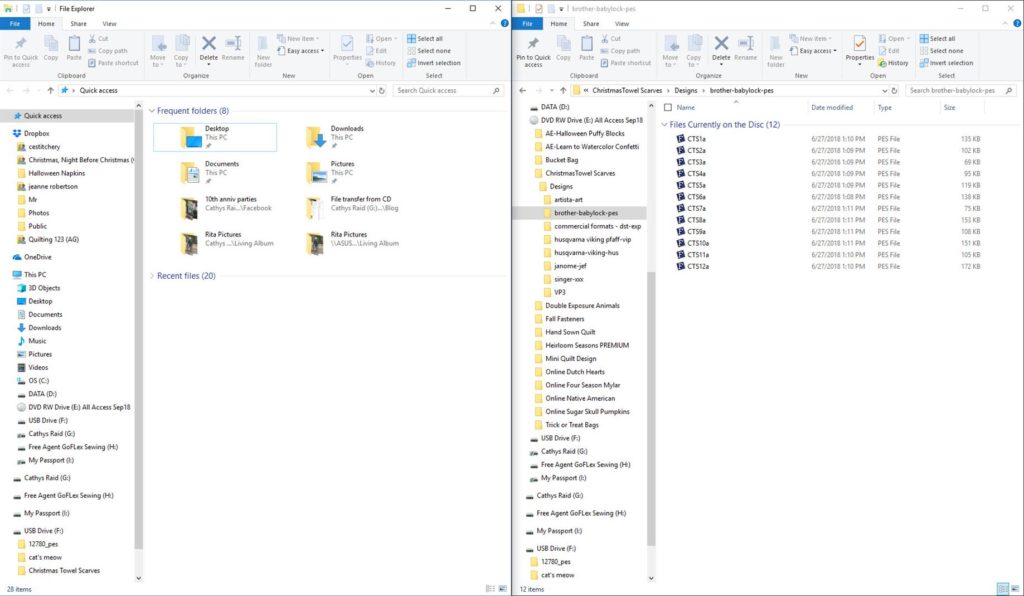
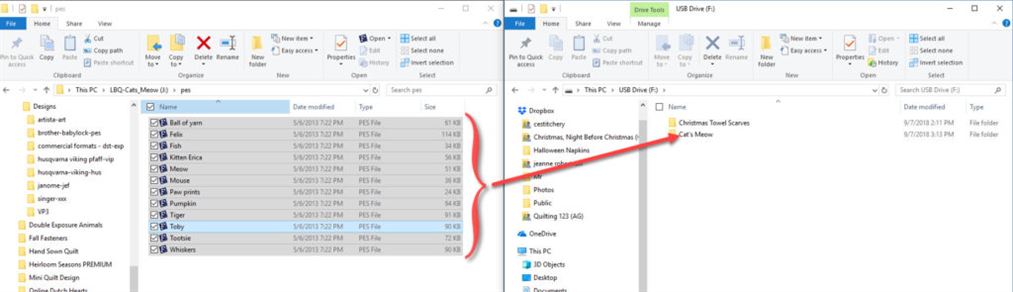
- Right click on the File Explorer icon again and select File Explorer from the drop down menu. This will open a second File Explorer window and make transferring files from one location to another much simpler.
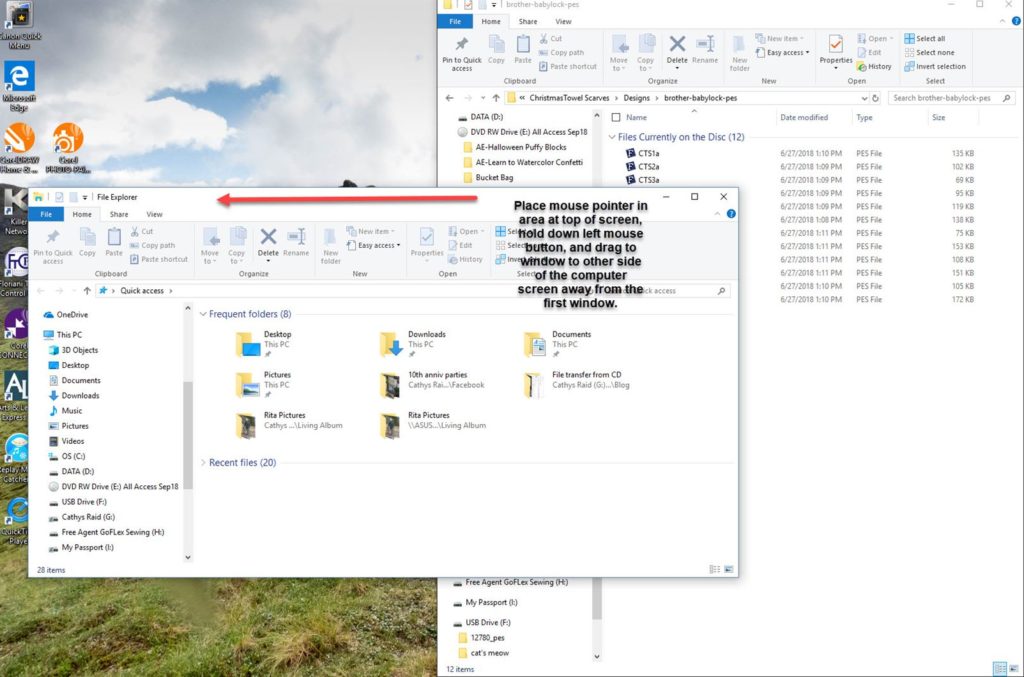
- Place two open File Explorer windows side by side on your screen. The easiest way to do this is to place your mouse pointer at top of the window and then while holding down the left mouse button, drag the window to either side of the computer screen. Drag it until part of the window is completely off the screen and then release the mouse button.
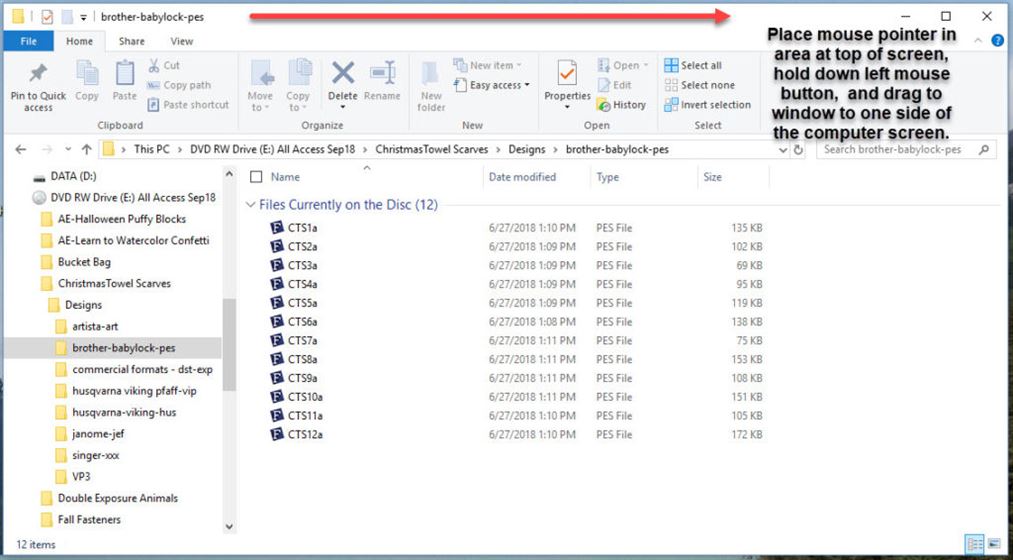
- The window will fill half the computer screen and on the other half you might see smaller windows of other applications that are open. You should also see the second File Explorer that you opened. Click on it, and it will fill the other half of the screen.
- If a second File Explorer window is not there, right click on the File Explorer icon, select File Explorer from the pop-up, and a new window will open. Place your mouse pointer at the top of that window, hold down the left mouse button and drag to the opposite side of where you placed the first window. Let go of the mouse button once part of the window is off screen.
You should now have two File Explorer windows side by side as shown above in #5.
Copy Designs To USB Stick
Create Folder
- Place USB stick into one of the USB slots on your computer.
- In one of the windows on your screen, click on the DVD/CD drive to open the CD and navigate to the source directory.

- In the other window navigate to your USB stick and create a directory with the name of the design collection.
Note: I highly recommend creating a folder for each different collection that you put on your USB stick for your machine. This will make it much easier to locate the correct design when you are ready to embroider.
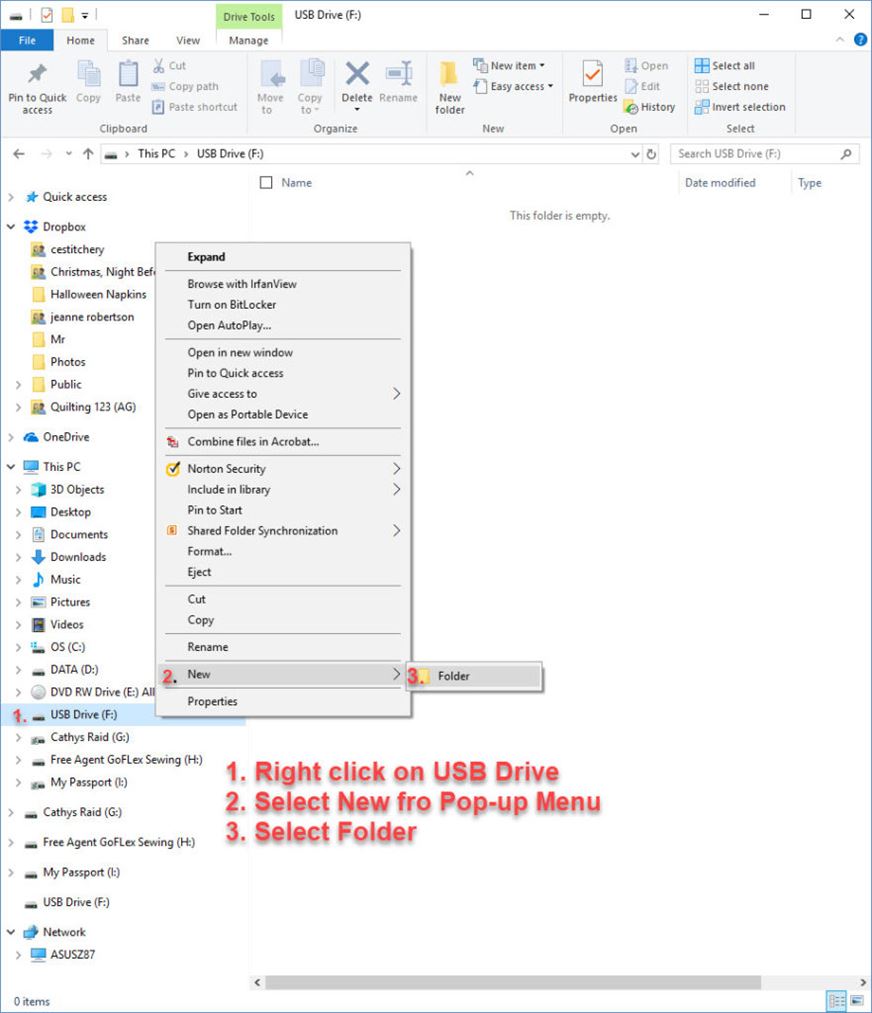
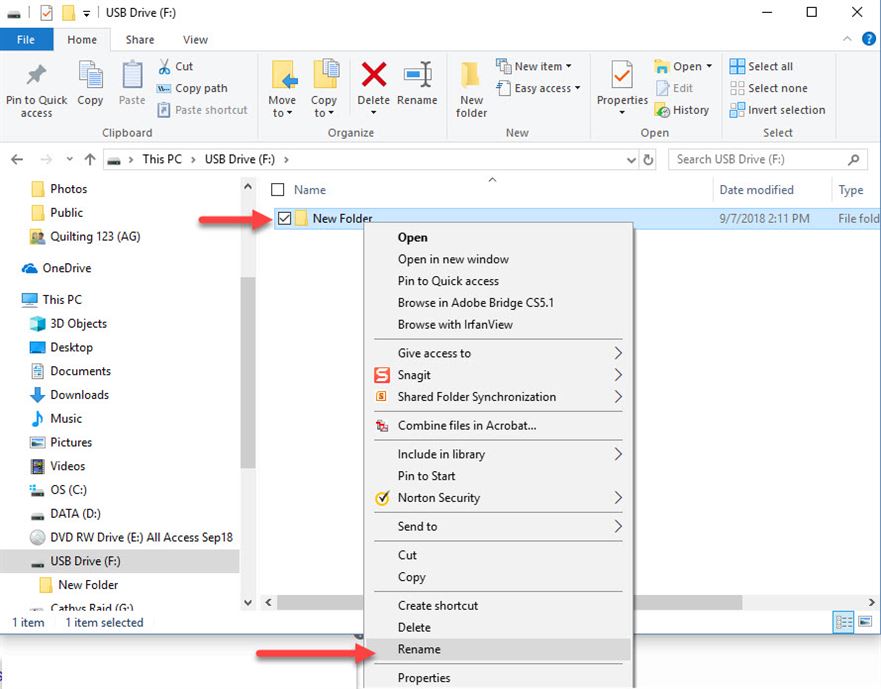
- Name the new folder so you can later find the designs. I just name mine the same as the source directory.

- If a new folder was created with the name New Folder before you got to type in a name, simply right click on the folder and select Rename from the pop-up menu. Type in the correct name.
Copy Files
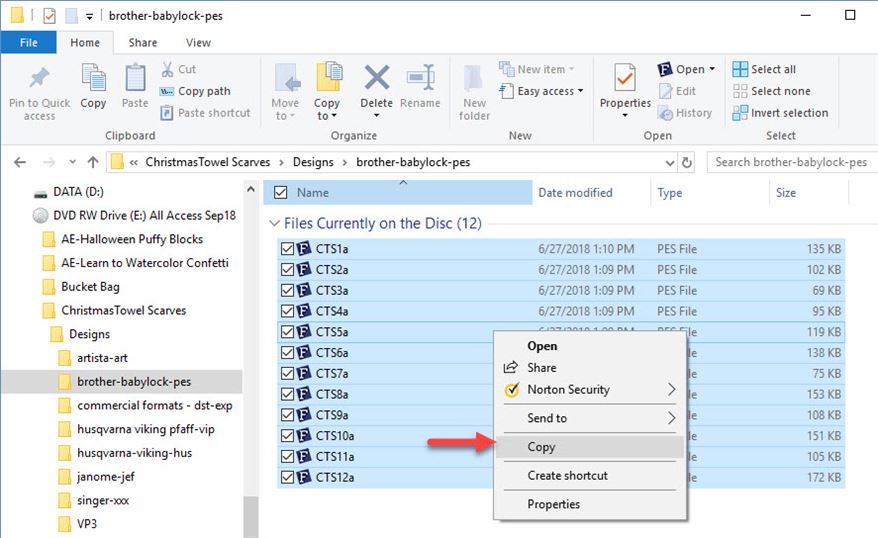
- Select the files you want to copy from the source disc. You can select them all by selecting the check box by the word Name at the top of the file list or you can click on the first file name in the list and while holding down the Shift key select the last file name on the list. Everything in between will be selected.
If you want only some of the files, hold the Ctrl key down while you select the files you want.

- Copy the selected files to your USB stick. Again, there are several ways to copy.
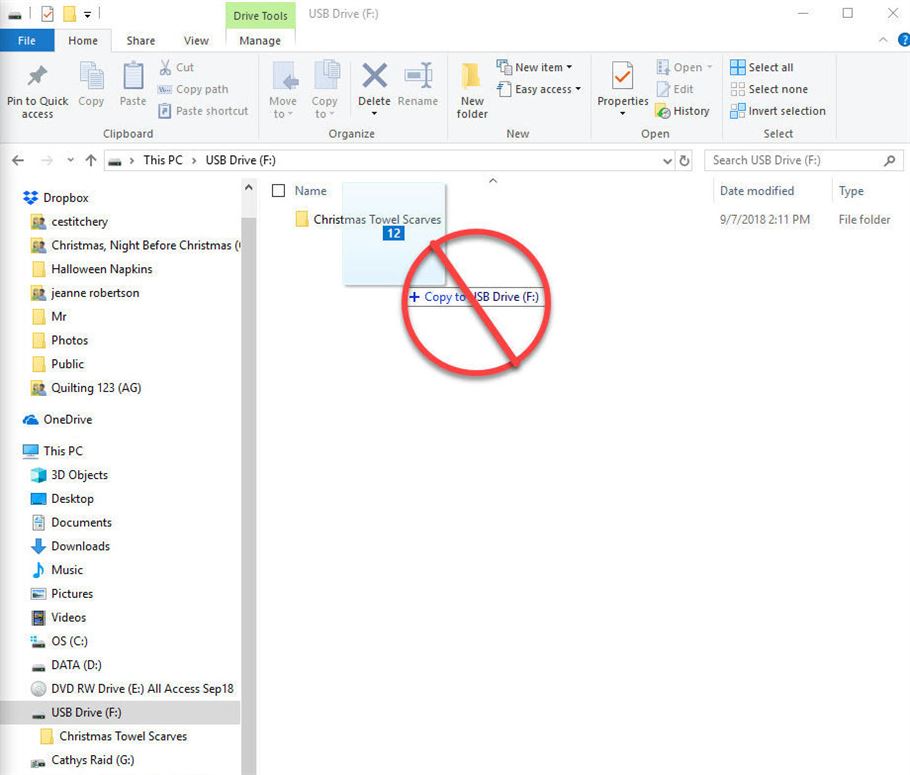
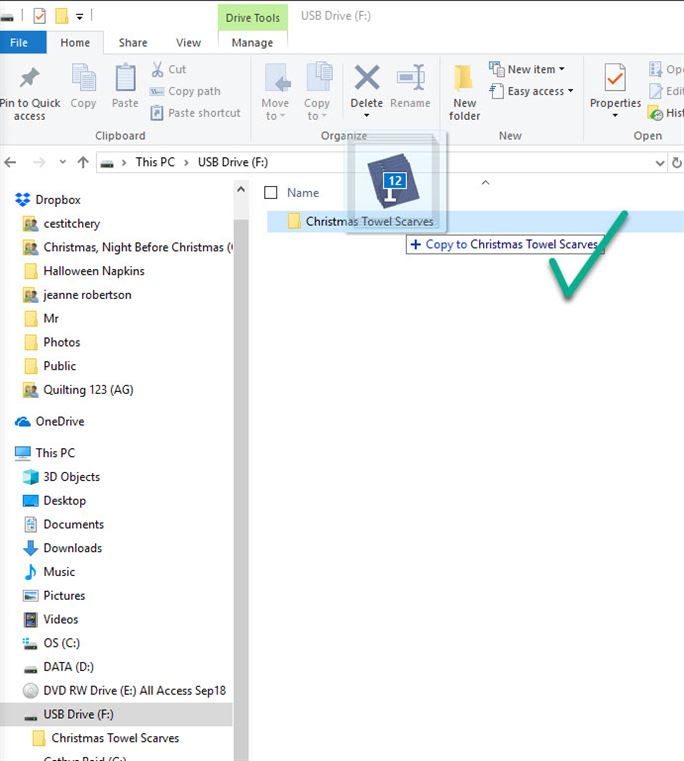
You can drag them from one screen to the other while holding down the left mouse button. When you get to the destination window, make sure the files are getting copied to where you want. You’ll see a pop-up that indicates the destination based on where your mouse pointer is. Don’t let go of the left mouse button until you’re sure they’ll be copied to the right location.
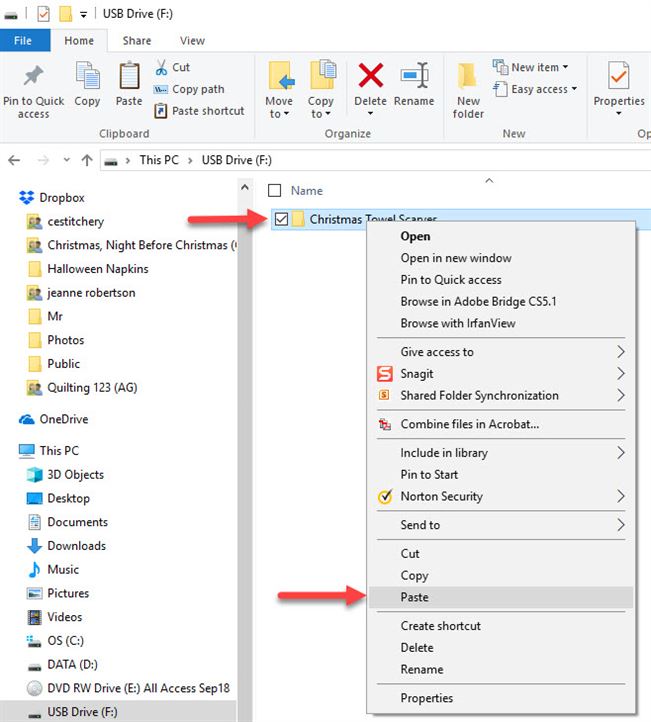
You can also copy by right clicking on the selected source files and selecting Copy from the pop-up menu. Then, navigate to the destination folder, right click and select Paste. Be sure to right click on the correct destination folder selected before pasting.
- Now your files are on the USB stick ready to place into your embroidery machine.
Other Sources
USB Stick
If your source files are on another USB stick, the procedure for copying is basically the same.
- Set up two windows on your screen, one for the source files and one for the USB stick destination.
- Create a directory on the destination USB stick for the files.
- Navigate to the source files you want and copy them to the appropriate directory on the destination USB stick.
Downloaded Files
Unless you have changed it, files downloaded from the internet generally go into a “download” directory on the C: drive or your computer. If you downloaded embroidery files simply navigate to the location of the download and copy them to the destination USB stick.
Zipped Files
If the files you downloaded from the internet are compressed into a zip file, you must “unzip”them before you can use them on your embroidery machine. There are many different applications that will manage zipped files, WinZip most notably. However, Windows has a built in zip extractor, so you really don’t need a separate program to unzip a file.
- Purchase and download embroidery files from an online supplier. Different suppliers will have different ways to give you a download link after purchasing designs. Here’s an example from OESD.
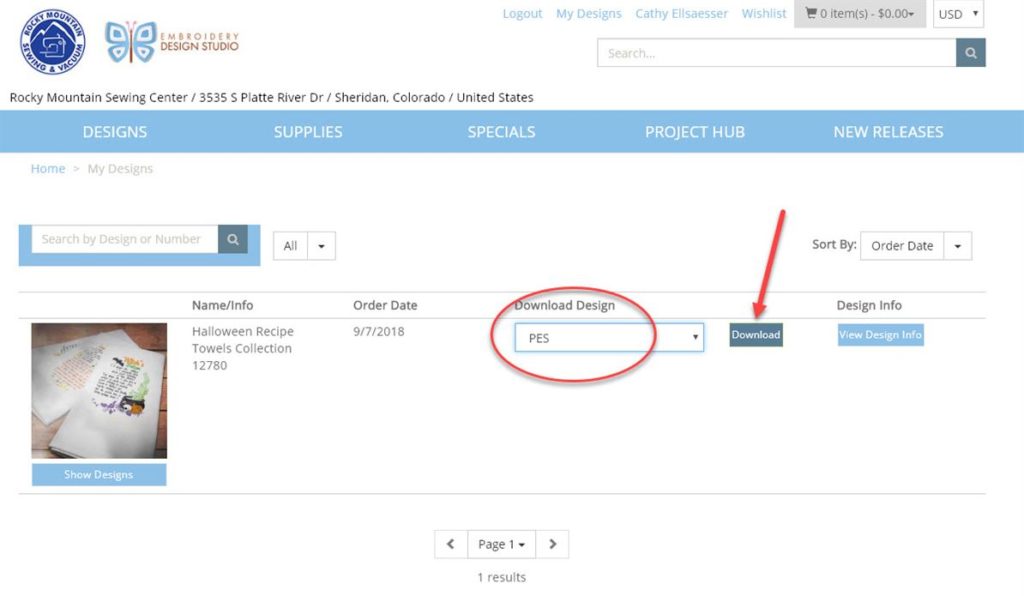
Note: Go to Products/Embroidery Designs on our website to purchase designs available from one of our suppliers, OESD. - When downloading a file be sure to note where it is saved on your computer. You might be asked for a location or it might automatically go to the downloads directory. It varies with the supplier.
- You can unzip your files directly to the destination USB after downloading the zip files. Open a File Explorer window and navigate to the location of the downloaded file. You must unzip files to use the designs on your embroidery machine. If the download(s) are already in the correct format for your machine, just copy them directly to your USB stick.
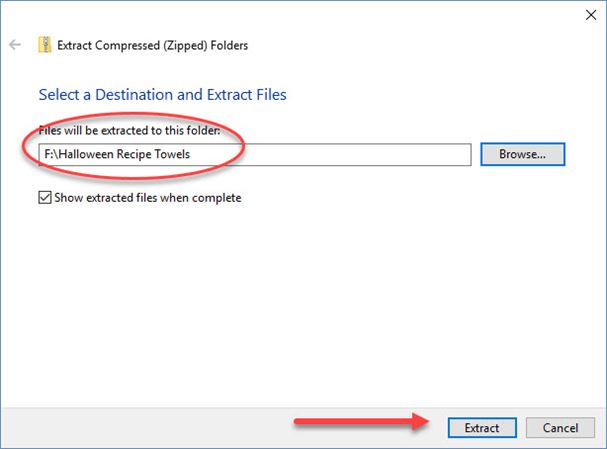
- To unzip a file, right click on the zipped file and select Extract All.

- From the Select a Destination window pop-up, navigate to the destination USB stick, and create a New Folder for the unzipped designs.
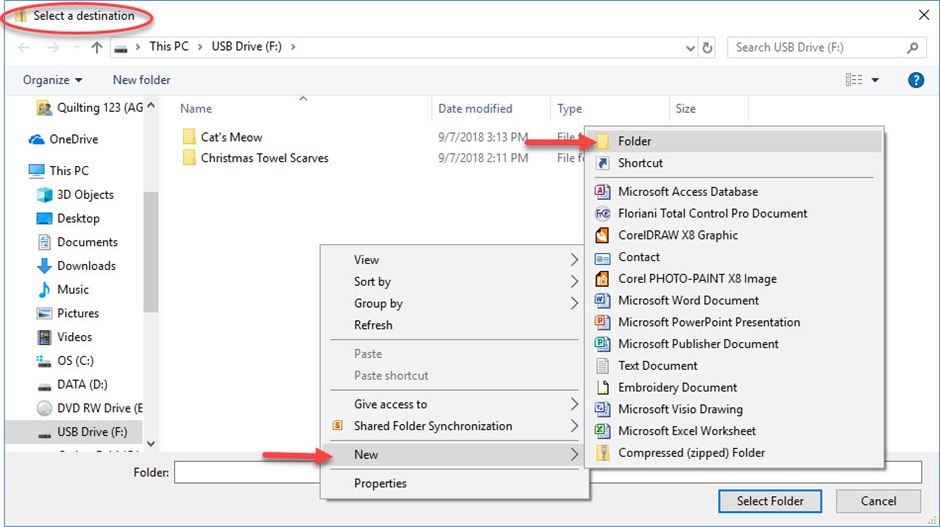
- Select the new folder
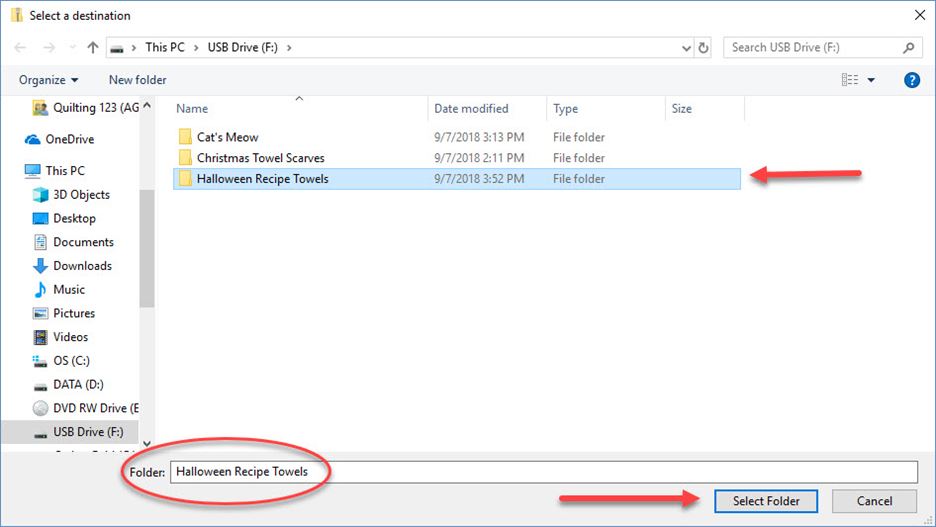
- Confirm destination and select Extract.
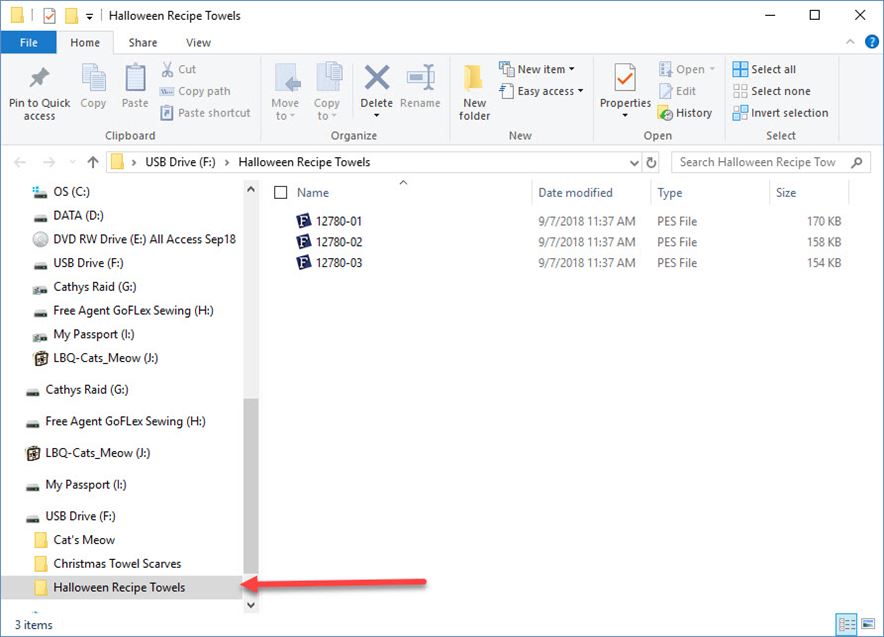
- Extracted files will be in the folder you chose.
Go Wireless
Of course, some of the newer machines all make this blog obsolete! More and more new machines are being introduced that allow you to send your designs to your machine wirelessly over your wifi network. No need for USB media. We know, though, that there’s still a lot of machines out there that must read designs loaded into the machine via a USB stick or other media. So, I hope this helps those of you who struggle with that process. I appreciate any feedback or questions you have. Feel free to comment below.
Comments
Cathy Ellsaesser
When you save the file on the Luminaire, it is saved as a .phx file. The machine can read other formats includeing .phc, but it only saves files as .phx. You cannot change that. The Persona does not read .phx files. It can read .pes, .phc and .dst files. I couldn’t find any info on what file format the Persona saves, but I suspect it’s .phc, so you can likely go from the Persona to the Luminaire but not from the Luminaire to the Persona.
You would have to use something like PEDesign or Floriani FTCu to convert the .phx file from the Luminaire back to a .pes file so the Persona can read it.
Hope this helps.
Dolores Coker
I want to save designs that came on my Brother Innovis XP1 to use on my Brother Persona PRS100 but they won’t open when I try to do this. How do I do this?
Megan McCabe
You can put your files on your USB as described above, but to find them on the machine you’ll need to plug it in, find the folder for the specific file, and then press the arrow up button to view the files. Hope this helps!
Barbara
I have a Janome MC9850 trying to download files to the the machine do u have to paste copy files thanks for your help
Cathy Ellsaesser
EXP+ is the correct format for the Bernina 790. Check out this reference from Bernina on sending designs to the embroidery machine and see if it helps.
Saving Designs to the Embroidery Machine
Couple of possibilities. Although you do not have to use a Bernina USB stick you have to make sure whatever stick you use does not have an manufacturer files on it. I am not sure if there is a size restriction for USB stick on the 790 but the smaller the better i.e 4 -8 gb.
Second guess would be that the designs you have on your USB stick are too large for your hoop.
I am not overly familiar with Bernina, but I do know that in other machines I am familiar with if the design is too big for the selected hoop then the design will not show up on the machine even though it is on the USB stick. Embroidery designs will automatically open in the hoop that is closest to the size of the design unless an embroidery hoop is already attached to the machine. So have you tried loading the USB without a hoop on the machine?.
What size is your design and what size hoop are you using?
Without actually being at the machine and seeing what’s happening, it’s hard to troubleshoot. Do you have a sewing store that sells Bernina near you. You could take your USB stick there and try it out on one of their machines to see if it works. In the meantime, check out the link I provided and see if that helps. Sorry I could be be more help and I hope you solve your problem.
Kathy Smith
I just read your blog on how to transfer files from CD to USB. I am having trouble with picking from the listing of formats under the design tab. I have a Bernina 790, absolutely love it, but can not figure out why my USB shows there are files on it, but when I take it to the sewing machine, nothing shows up. Am I using a wrong format? I have tried EXP, PES., PEC, Dst, etc etc. what am I doing wrong????
Cathy Ellsaesser
We have 4 stores in Colorado — three in the Denver area and one in Colorado Springs. Check out our web site at wp.rockymountainsewing.com for information about in-store machine usage classes. The machine usage classes are free and you do not have to have purchased the machine from us.
Alonzo Rodriguez
I have never used a sewing machine but i bought a used Brothers sewing machine awhile back at a yard sale hopeing to learn some day , they didn’t come with a manual so i have no idea how to use it . I am hopeing to find someone or a group who can teach me how to use it . if you know of anyone or a group please let me know . Thanks