Is bling still a thing? I hope so, because I like the look of rhinestone-embellished embroidery. I’ve run across a few designs here and there that incorporate rhinestones in their designs, but I want to make my own. Recently, Brother introduced an add-on feature to their ScanNCut Canvas application to design hot-fix rhinestone designs. With this application you can create your own designs that are either all rhinestones, or have rhinestones incorporated into an embroidery design. In addition, once you purchase the Brother rhinestone kit, you can download Brother’s rhinestone designs from their Canvas website.
Check out the details of how to sign up for CanvasWorkspace, and how to register your rhinestone kit on the CanvasWorkspace in my previous blog, The Brother Rhinestone Kit Part 1: CanvasWorkspace.
The Embroidery Design
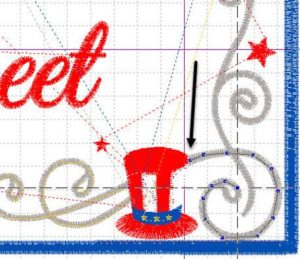
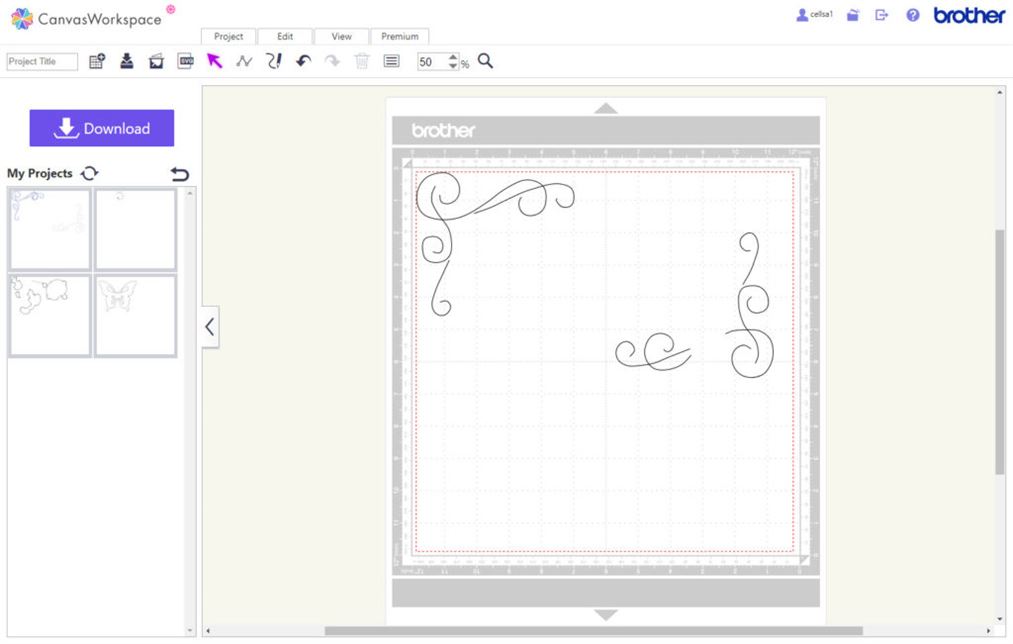
I decided to modify an existing embroidery design for rhinestone application. For this project I chose a design from the Anita Goodesign Seasonal Welcome Signs. I am going to replace the satin stitch swirls in the corners with rhinestones to create a rhinestone-embellished embroidery.
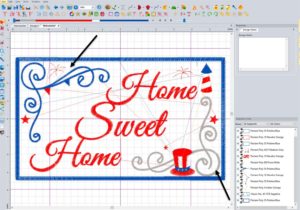
All I need to do is trace the swirls to create a path for the rhinestones.
Trace Path
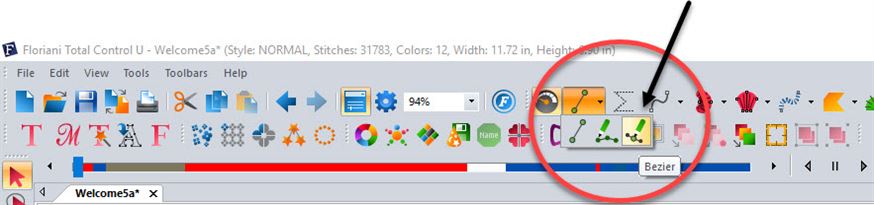
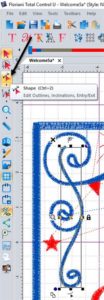
We need to create artwork that can be exported into the CanvasWorkspace application to create the rhinestone template.
Select the Bezier Artwork icon ![]() in the top menu.
in the top menu.
Trace the swirls by left clicking along the path of the swirls. Small blue squares along the path of the swirl are created as you left click. Double click when you have finished tracing each path. Think about how the rhinestones will look and trace accordingly. For example, I did not trace the loops at the ends of the swirls as I think that it would look odd with the rhinestones trying to follow that path.
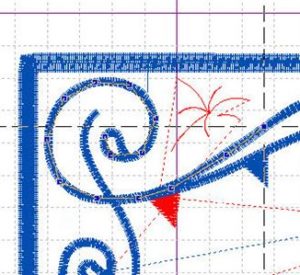
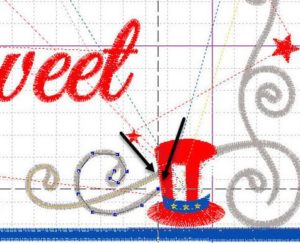
For the swirls in the bottom right corner, stop creating the path (double click) when you reach the hat, and begin again on the other side of the hat.
Smooth Curves
Once you have each segment of the paths traced, it is easy to smooth them out into beautiful curves.
- Select one of the segments you created.
- Click on the curve icon on the left side of the screen.
- The points that define the line are shown.

- Holding down the left mouse button select all the points by drawing a box around them. Alternatively you can left click each point while holding down the shift key. With the points selected, right click and select smooth.
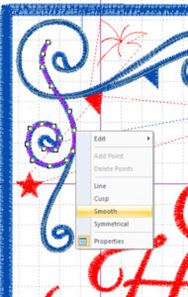
- Do this for all the segments you traced.
- Each traced segment will be smoothed out so that there are no sharp bends in the paths.
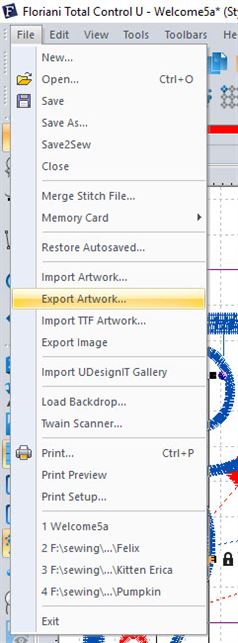
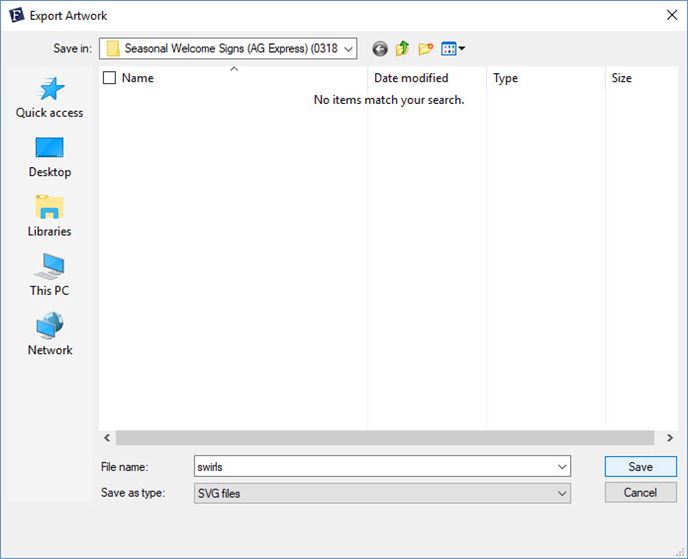
Export Artwork
The CanvasWorkspace software accepts .svg files to create cut data for the ScanNCut.
The next step, then, is to export the artwork representing the paths we want the rhinestones to follow and send it to CanvasWorkspace online.
When we select Export Artwork from the Floriani FTCu menu, only the artwork will be exported. No need to worry about the stitches that make up the embroidery design.
To export the artwork, simple click on File/Export Artwork from the menu and Save the .svg file. Just remember where you save it!
Import Artwork into CanvasWorkspace
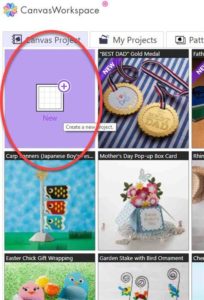
Open up CanvasWorkspace on the internet and login.
Click on New to create a new project.
From the workspace that is created, click on the .svg icon ![]() .
.

Navigate to the location of your saved artwork .svg file and click on Open.
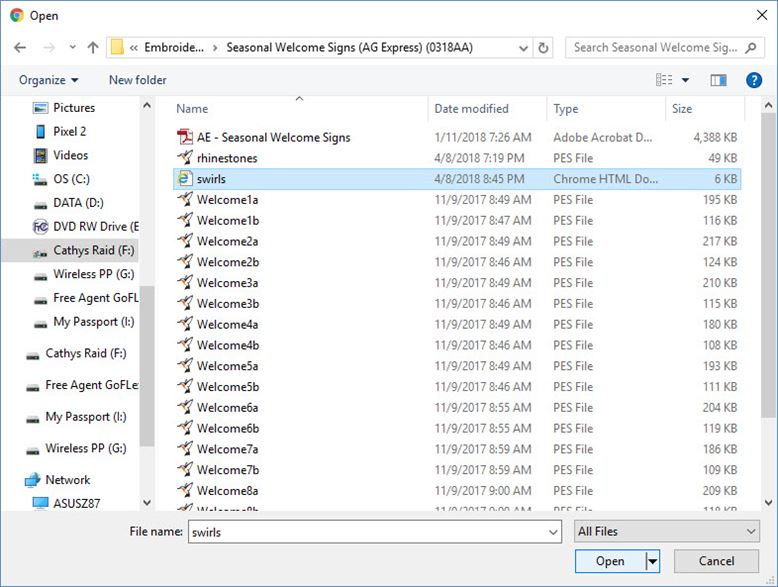
Now your artwork is ready to be “rhinestoned!”
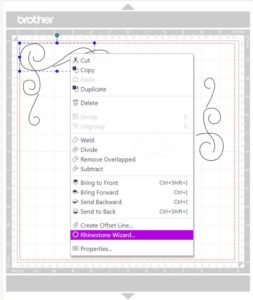
Add Rhinestones to Path
Select one of the paths for your rhinestones and right click.
Select Rhinestone Wizard from the popup.
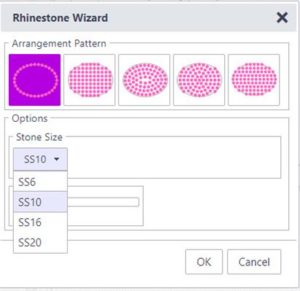
A requester will open allowing you to select the size of rhinestone you want to use and the spacing between stones.
I have selected the SS10 (3mm) stone with a spacing of 0.1 inch. I also selected that I want the stones to follow the outline, not to fill in an object.
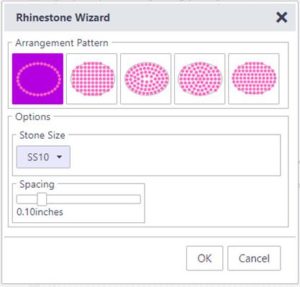
Click on OK and the selected path will be filled with holes designating rhinestone placement.
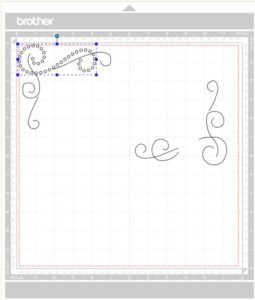
Continue with each segment you created in FTCu to place all the rhinestones.
Note: You can select all segments at once if desired. Either left click and draw a box around all items to select them, or hold the shift key down while clicking on each segment. You can then right click and select Rhinestone Wizard and apply the rhinestone parameters you wish to all of the selected segments.
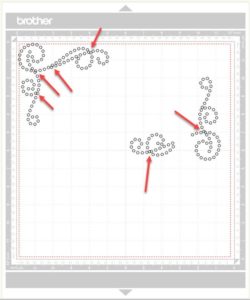
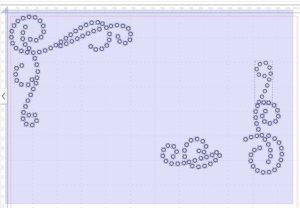
Edit Placement
Because the swirls overlap in places some of the rhinestones will be too close together if we don’t make a few adjustments. The spots with the red arrows below need to be fixed.
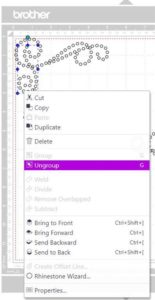
Ungroup Rhinestones
Rhinestones on each segment created when you use the Rhinestone Wizard are grouped together. So you must ungroup them to delete or move single rhinestones. Simply select the segment, right click and select Ungroup from the popup menu.
Delete or Move Rhinestones
Now you can select individual rhinestone by clicking on them. Small blue lines appear around the selected circle(s). Delete the circles with the delete key on your keyboard or move them by left clicking and dragging the circle to the desired location.
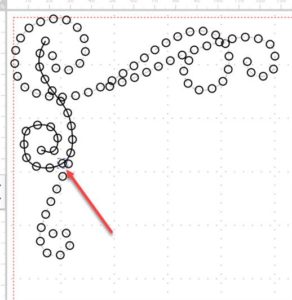
Note: Once you have ungrouped the rhinestones, the line that was used to determine the path of the rhinestones appears. (It is a faint grey before ungrouping.) Click on the line and then delete it so that it doesn’t become a cut line when the design is sent to the ScanNCut. Be sure you get just then line when you select it. If you accidentally delete the line and the rhinestone placement circles, just click on undo ![]() in the top menu.
in the top menu.
Continue the process of removing or moving all rhinestones that seem to be out of place as well as the path lines.
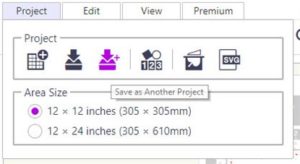
When you are satisfied with the placement, save the project by clicking on the save as new project icon ![]() on the project tab. The project is saved to your online workspace.
on the project tab. The project is saved to your online workspace.
Send File to ScanNCut
Once all overlapping rhinestones have been moved or deleted, and the corresponding path lines have been deleted, it’s time to send the file to the ScanNCut.
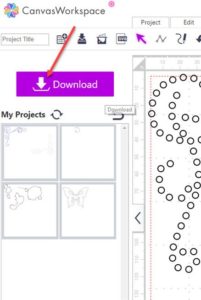
If you have a ScanNCut2 with wireless capabilities AND if your ScanNCut2 is on your home network, you just click a button to send it wirelessly to the ScanNCut. (Part of the Triangle of Goodness!) Alternatively, you can save the file to your computer or a USB stick for later transfer to the ScanNCut. Either way, start by clicking on the Download button.
Adjust Placement if Necessary
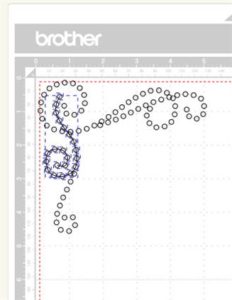
If any part of your design is outside of the red dotted line on the workspace, you will get the following error:
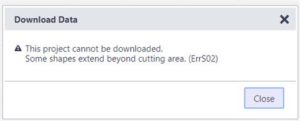
So, I had a some of the rhinestone placement circles outside of the red lines on the top left of the design.
It is important to keep the positions of the cut lines the same relative to one another so that when you add the rhinestones to the embroidery they are positioned correctly. Thus, I need to move all of the circles at the same time so that they all stated in the same place relative to one another.
Simply select all the circles by holding down the left mouse button and dragging a rectangle around all of the circles. When you let go of the mouse button all items inside of the rectangle will be selected as indicated by the little blue lines around each circle.
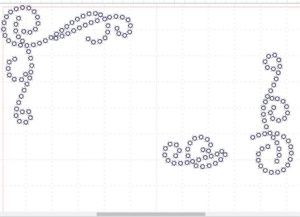
Then, while they are all selected, left click on one of the selected circles. Drag the mouse to move the circles down and over, making sure they are all inside the red dotted lines on the screen.
PC or Direct to ScanNCut
With this new placement, you are ready to download. Click the download button as before, but now that everything is within the cutting area of the ScanNCut you will be able to send the file to the PC or ScanNCut.
Select either the Download to PC or the ScanNCut Transfer icon to save the file in fcm format for the ScanNCut.
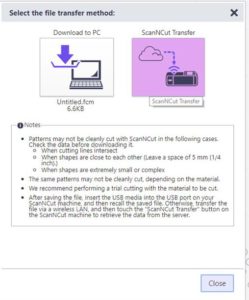
I used the wireless transfer. After a few moments, this message will appear:
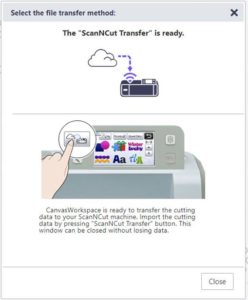
The next step is at the ScanNCut machine.
Using the Brother Rhinestone Kit on the ScanNCut
Cutting the Template Sheet
Test Cut
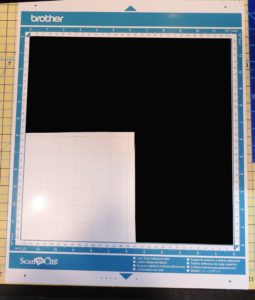
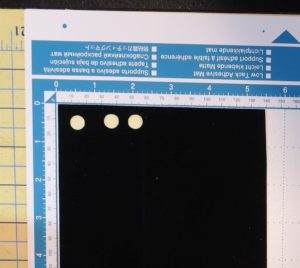
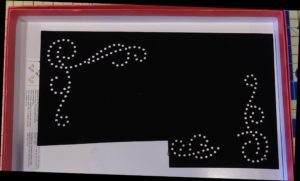
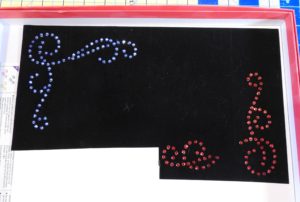
The template sheet in the Brother Rhinestone Kit is the black fuzzy 12″ x 12″ sheet. It has a removable backing that is adhesive.
With the black side face up, attach the template sheet to a standard ScanNCut mat (turquoise and purple). (I have used a part of this template sheet before, so some of it has been cut out.)
Select Test from the saved data screen and perform a trial cut to determine the blade depth and cutting pressure needed. Select one of the test patterns, set parameters, set and then cut a test. The blade must cut through the black part of the sheet, but NOT the backing.
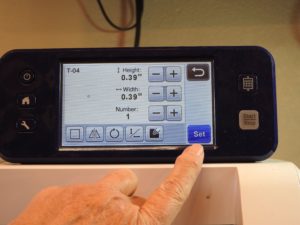
The manual suggests blade extension of “6” and cutting pressure of “0”. My blade was a little old, so I had to move the extension to 7 and change pressure to 1.
Load Design
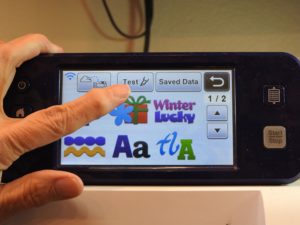
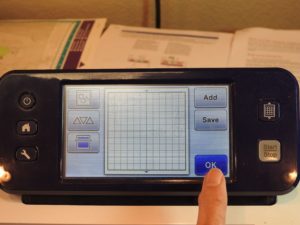
Recall the rhinestone pattern you sent to the machine wirelessly or place the USB stick with the fcm file into the machine.
If recalling from the wireless download, touch the cloud icon on the ScanNCut to load the design into the ScanNCut. The last design downloaded from CanvasWorkspace will be loaded into the machine.
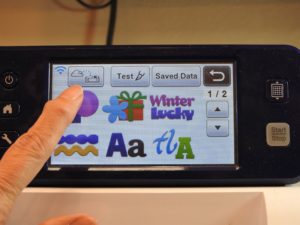
If you are using a USB stick, then touch the Saved Data button and locate the design on the USB stick.
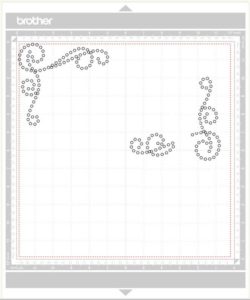
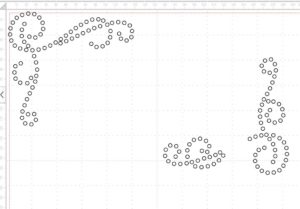
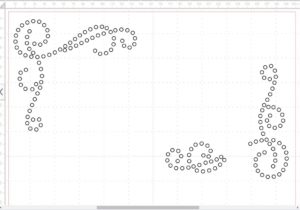
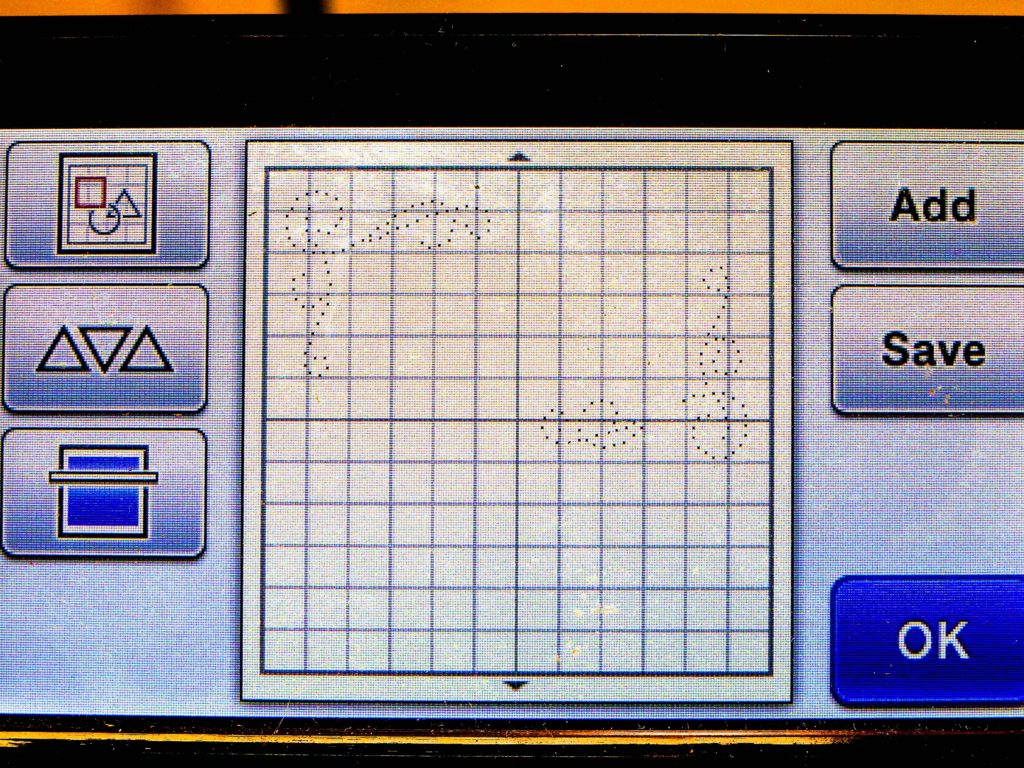
Here is the rhinestone cutting design I created in CanvasWorkspace. Note that only the lines created as artwork were exported to the fcm file.
Cut Design
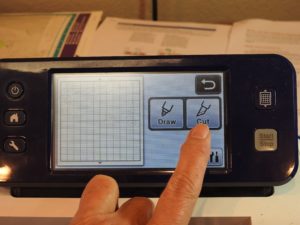
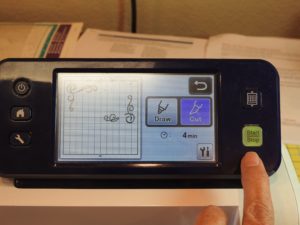
Touch the scan button  to verify placement of the cut pattern with respect to the template you have placed on the cutting mat. Make sure that the design is completely on the template. Move as necessary, but do not resize or break the elements apart.
Once the design is where you want it, touch the OK button, then the Cut button on the screen, and then the green Start/Stop button on the panel.
Clean up Template
Unload the mat from the ScanNCut and remove the template from the mat.
Cut the template sheet along an outline slightly larger than the design.
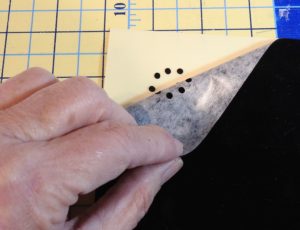
Place the template sheet on a flat surface with the backing down.
Quickly peel the template sheet off horizontally.
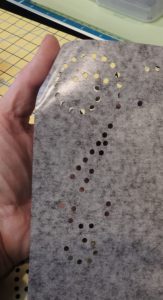
The template cutouts should remain attached to the backing. Use a pointed object such as a awl to punch out any rhinestone hole with the backing still in it. Punch the holes out from the back (adhesive) side so that the adhesive side of the punch outs don’t stick to the template.
Add Rhinestones
With the shiny side up, place a white backing board inside the lid of the Brother Rhinestone Kit box.
Place the template, black side up, adhesive side down, on the backing board.
Pour slightly more rhinestones than needed on top of the template. Since I am using two colors of rhinestones, I am taking care to keep the rhinestones close to the area they go in. Use the positioning brush to position the rhinestones in the holes by gently moving the brush in a circular motion.
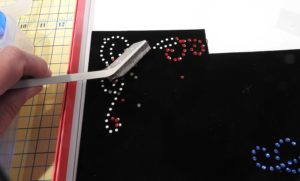
The Brother Rhinestone Kit also comes with a rhinestone pick-up tool with a silicone nib. Use this if you are having difficulty getting the rhinestones in the holes with the positioning brush.
If you are using different sizes of rhinestones in your design, place the larger stones first.
Transfer Sheet
Included in the Brother Rhinestone Kit are a two clear transfer sheets with green backing.
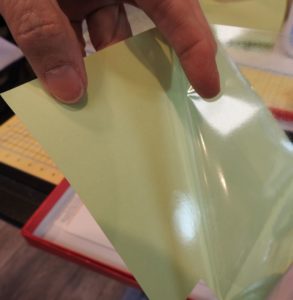
Cut a piece of transfer sheet slightly larger than your template. Peel off the backing and attach the transfer sheet, adhesive side down on the top of the rhinestones. Use your hands to firmly press down on the transfer sheet so that it is affixed to all rhinestones.
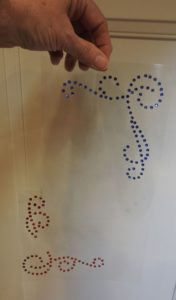
Remove the transfer sheet from the template, making sure all rhinestones have been picked up by the transfer sheet.
Rhinestone-embellished Embroidery
Place the transfer sheet with the rhinestones adhesive side down on your embroidery design. For my design, I lined up the rhinestones with the little flags in the upper left corner and the space left for the hat in the lower right corner.
Note: When I sewed out the embroidery, I just skipped the steps that sewed the satin stitch swirls in the corners.
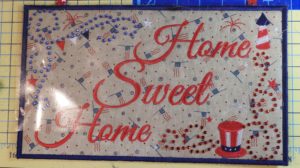
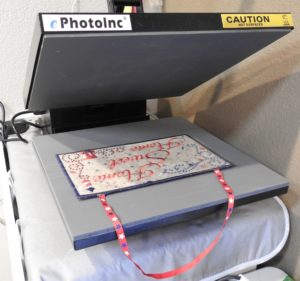
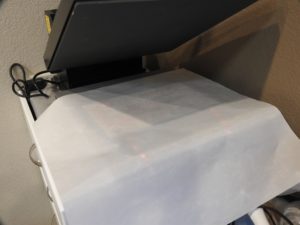
Once you are satisfied with placement, use an iron at medium setting (284°F to 320°F) to adhere the rhinestones to the embroidered fabric. It is best to have a ironing cloth or Teflon sheet on the top of the design. Depending on the thickness of your fabric, you may want to add an additional piece of fabric under the fabric receiving the rhinestones to cushion the rhinestones and provide better adhesion. Press the iron down for the required time to adhere the rhinestones, then lift the iron to move to a different section if necessary. Do not slide the iron over the surface.
I have a heat press and set it at 320°F, placed a teflon sheet on top of the design and pressed for 45 seconds. The rhinestones adhered beautifully.

Coupon
If you are ready to try your hand at rhinestone-embellished embroidery designs, here’s a coupon for 25% off any rhinestone supplies at your local Rocky Mountain Sewing and Vacuum store. This includes the starter kit or additional supplies like rhinestones, template or transfer sheets. Put some bling on your next project and see it sparkle!