Did you attend Anita’s University hosted by Rocky Mountain Sewing and Vacuum earlier this month? Did you come away with even more embroidery collections? So now, how do you manage embroidery collections that you own? Do you keep them on a computer, a USB stick or just the original CD? You can increase your productivity and maximize the chance of finding that design you’re looking for if you’ll take the time to develop and use a filing system for your designs. These methods may take a little more time “up front” but the rewards in knowing what you have, where you have it and how to get it to your embroidery machine are worth the trouble.
Certainly, everyone has their own way of doing things, and this blog is just one of many that will work. I am just sharing with you what works for me. I hope you’ll find it helpful.
Sources of Designs
CDs
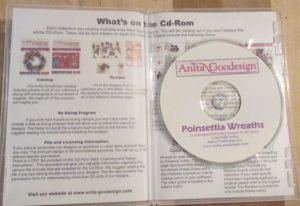 All Access and individual collections from Anita Goodesign usually come on a compact disc (CD). (Those that are downloaded from the web will be addressed below). Likewise, if you purchase design collections, whether it’s Anita Goodesign, OESD, Kimberbell, Floriani, etc., from one of our stores, it’s likely that they, too, are provided on a CD, but they might be on a USB stick. So, you have to get the designs to your machine. A USB stick might be able to be read directly in your machine. If the designs are on a CD, however, you from a CD to a USB stick then place it in your machine. For those of you lucky enough to have the Brother machines that accept the BES4 wireless upgrade, you can bypass the USB stick and just send the design(s) wirelessly to your machine.
Another option is to create a directory on your PC hard drive and copy the files on the CD to your PC. Then, later, when you want them, you can place the designs you want on a USB stick for use in your machine. At first glance, this sounds like some double work, copying to a PC and then to a USB stick as opposed to just straight to a USB stick. However, I don’t want every collection I own on a USB stick. I don’t want to have to search through and load a CD everytime I want to get designs into my embroidery machine. Thus, I like to get the embroidery designs copied to my PC hard drive, and then put them on a USB stick as I need them.
Download From the Internet
There are many, many, many online sources for embroidery designs. One of my favorites our affiliate site, Embroidery Design Studio. Whatever your source for downloads the process is the same. I recommend creating a directory that identifies your downloads and place them there.
Zipped files
If your downloaded files came “zipped” you will need to extract the files from the zip before you can use them. I recommend extracting them to a directory on your computer hard drive. You can also save the original zip file in a separate directory in case you ever need to extract them again.
Read on to see one way to organize your designs on your home computer, whether from a CD or a download
Where To SaveYour Files
Imagine having a filing cabinet in your home where you have tax returns, receipts, warranties and a myriad other paper items you want to save. Would you just throw all the papers into a drawer, all mixed up, without any organization? I hope not!
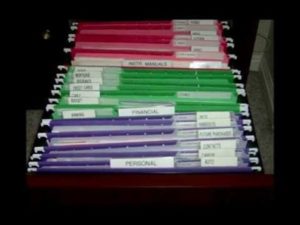
In all likelyhood, you would create folders with labels for each type of paper you are saving. You would create a folder for taxes — probably a folder for each tax year and maybe even further divide that into state and federal taxes. You’d have a folder for receipts, a folder for manuals, a folder for warranties, a folder for financial information, etc. etc.
Microsoft Windows like to keep things tidy by saving items like photos in a “pictures” directory, videos in the “videos” directory, documents in the “documents” directory. They are so clever over there at Microsoft! Alas, though, there is no sewing directory, so maybe they’re not so clever after all.
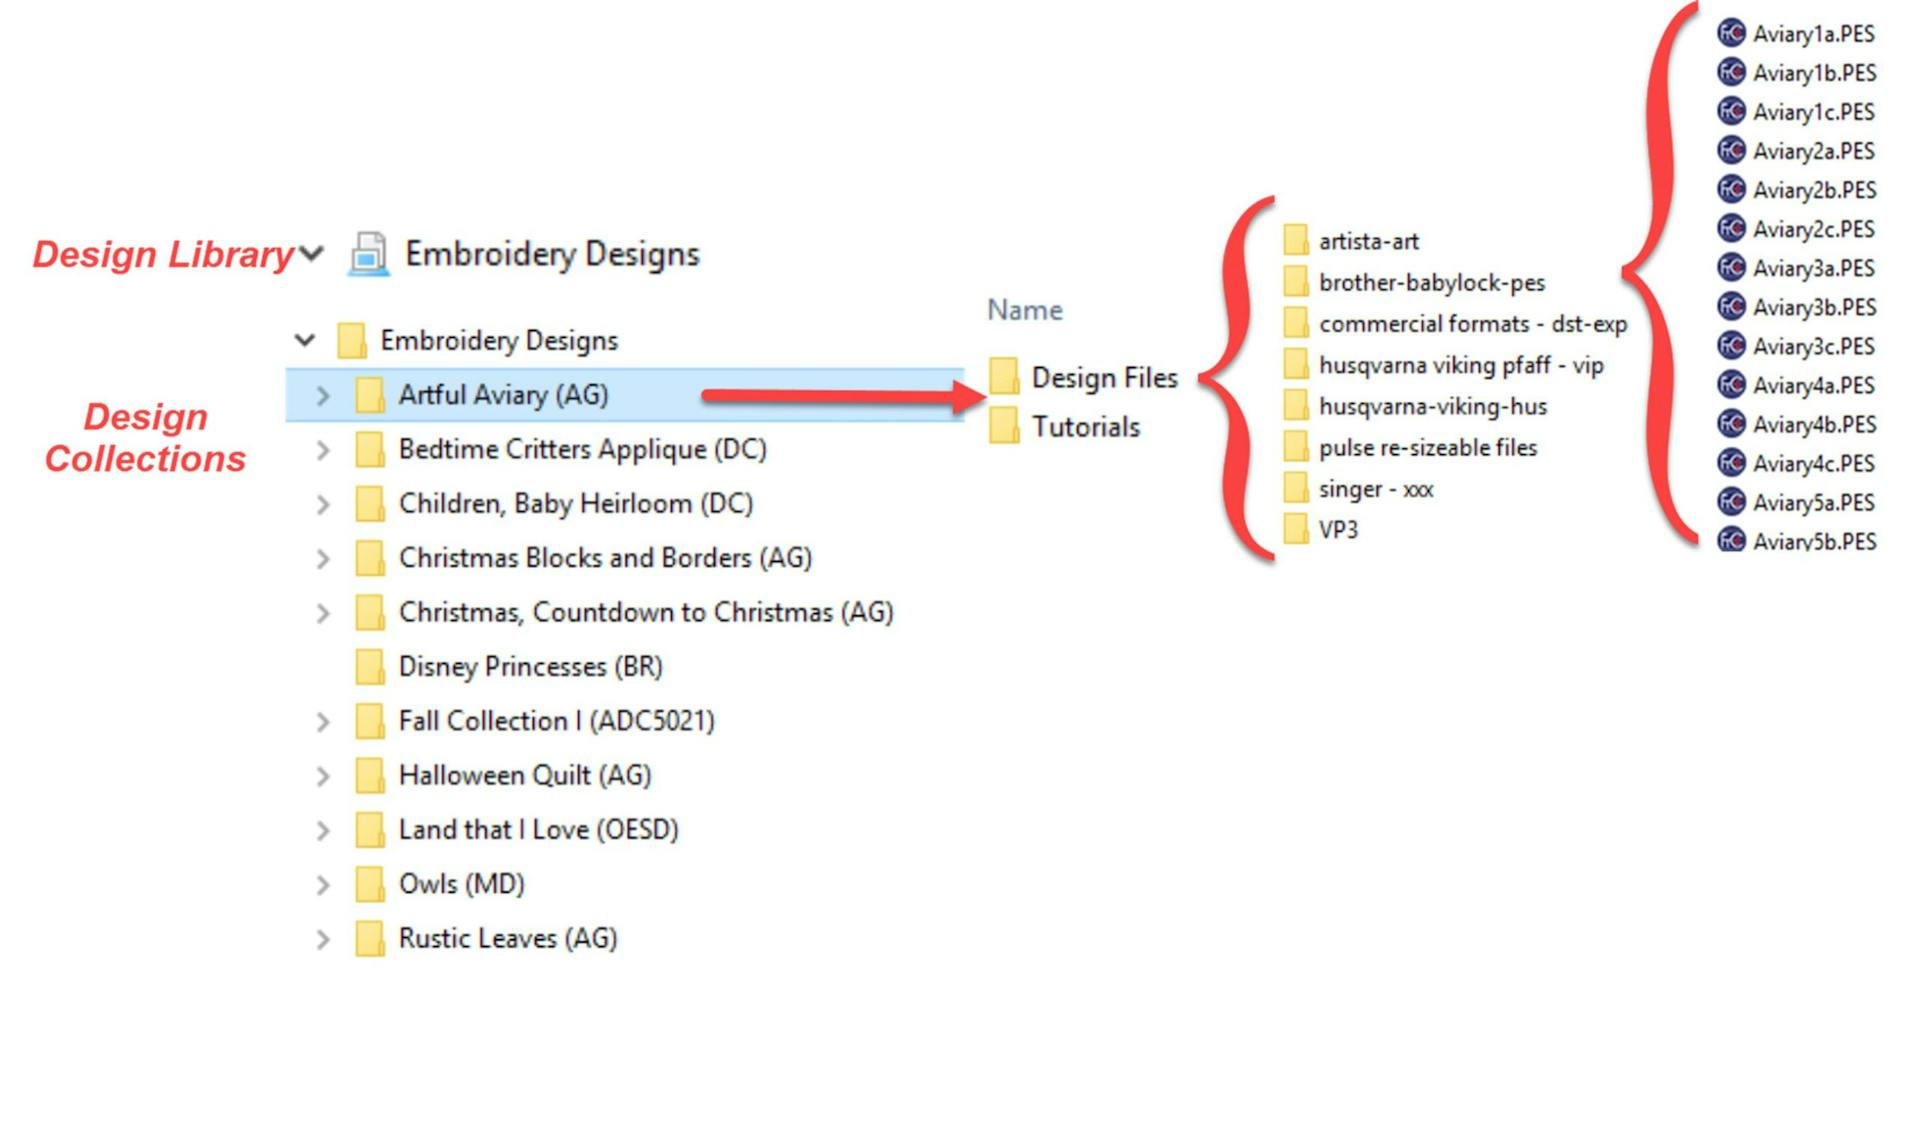
So, for embroidery designs, I recommend you create a master folder on your hard drive called “Embroidery Designs” or something similar. This is the “filing cabinet”. I recommend you create a library item for this purpose and here’s how.
Create an “Embroidery Designs” Library
One easy way to find your files is to create a library in Windows File Explorer (formerly known as File Manager.) Libraries always show up when you open Windows File Explorer.
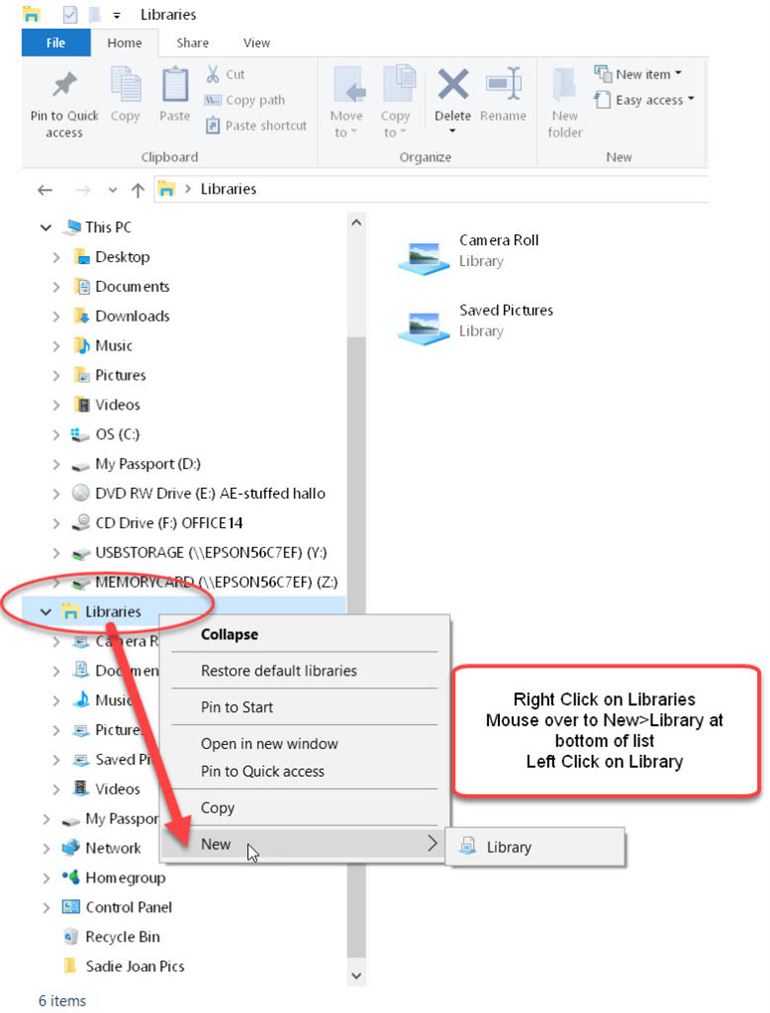
Open Windows File Explorer and right click on Libraries.
Mouse over to New/Library; left click on New
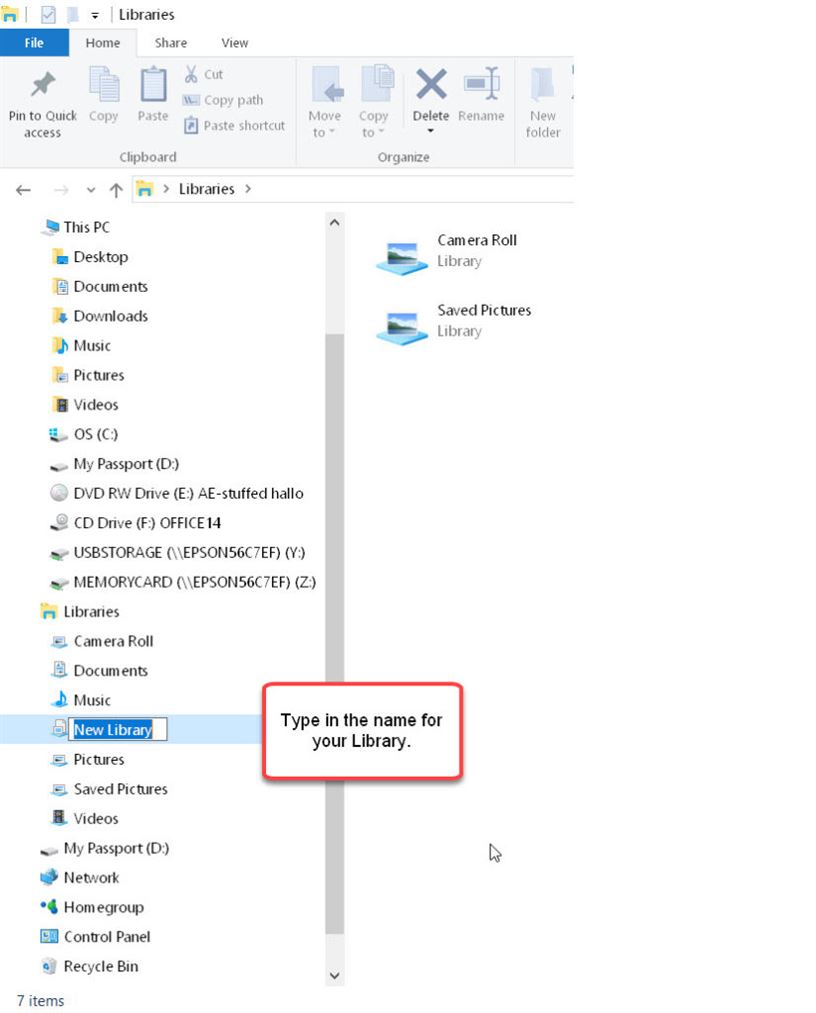
Click in the box and type in the name for your library. (I’m using “Embroidery Designs “). Please note, you must type in the name for your library before you click your mouse. You must see the box outlining “New Library” and move the cursor to that box, but don’t click the mouse until you are done typing the new name. Otherwise, you’ll create a library called “New Library” and will have to rename it. No worries if that happens, though. Just right click on the New Library and select “rename” to get another chance to type in the name you want.
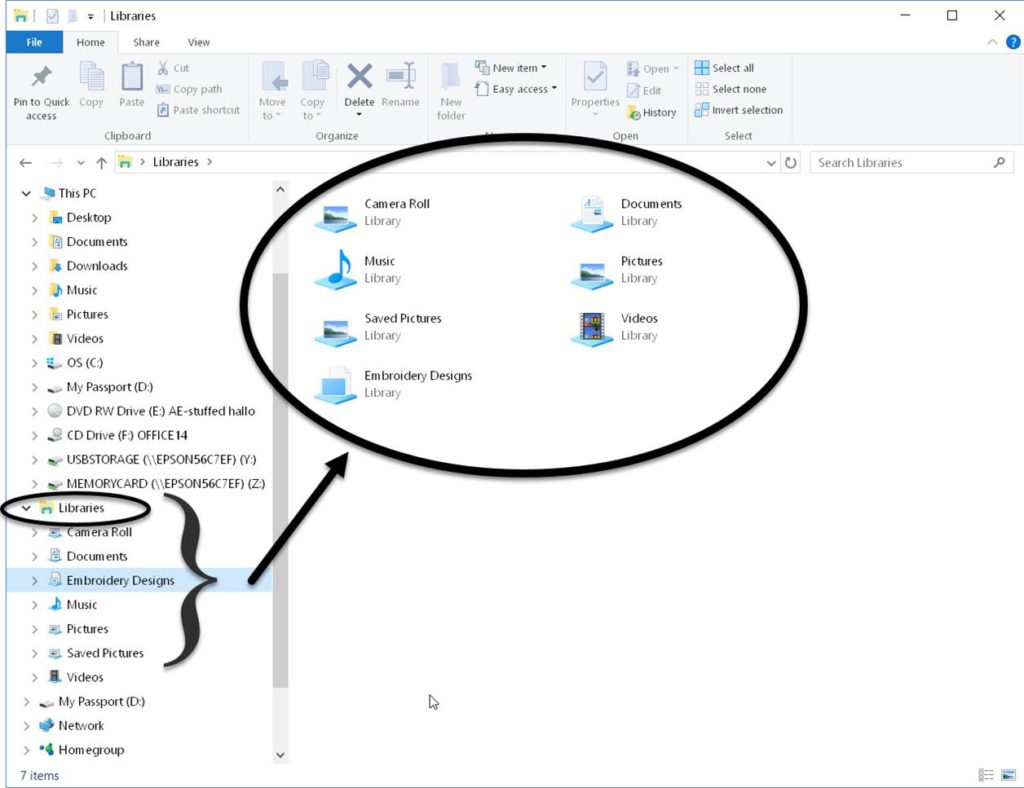
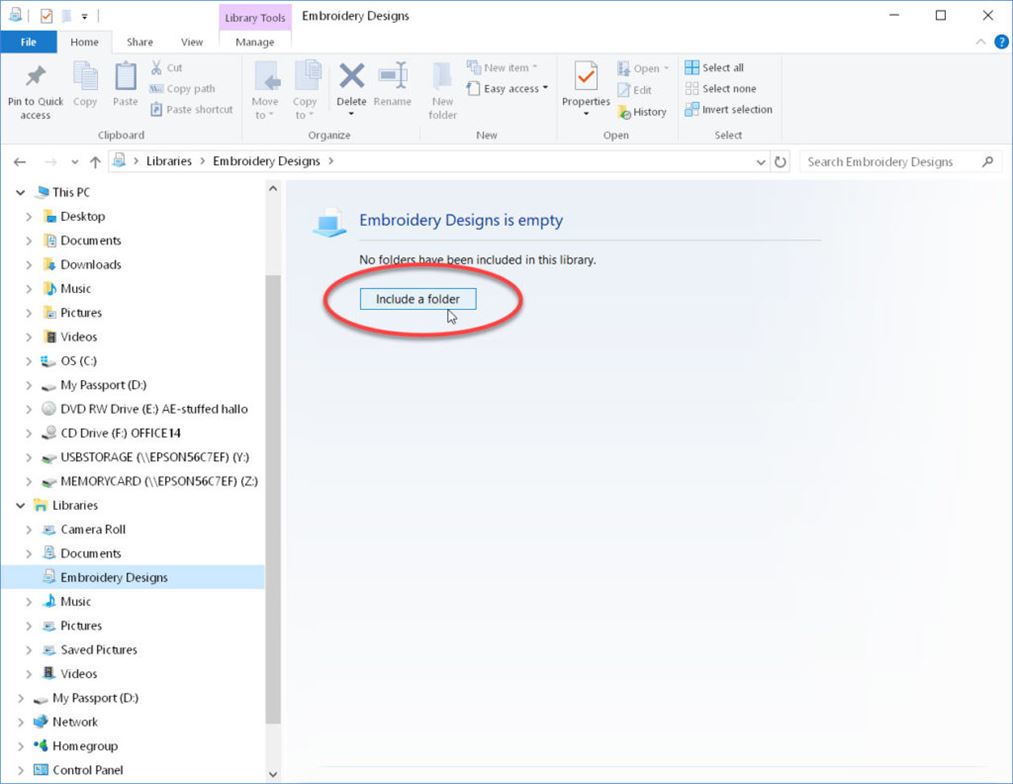
Click on the library you created and, when the screen expands, you’ll see a message that the library is empty. Click on “Include a folder”
A screen with all the library folders will come up. Mouse over to the right side of the screen, placing your cursor somewhere under the exisitng folders.
Right click and mouse over to New>Folder.
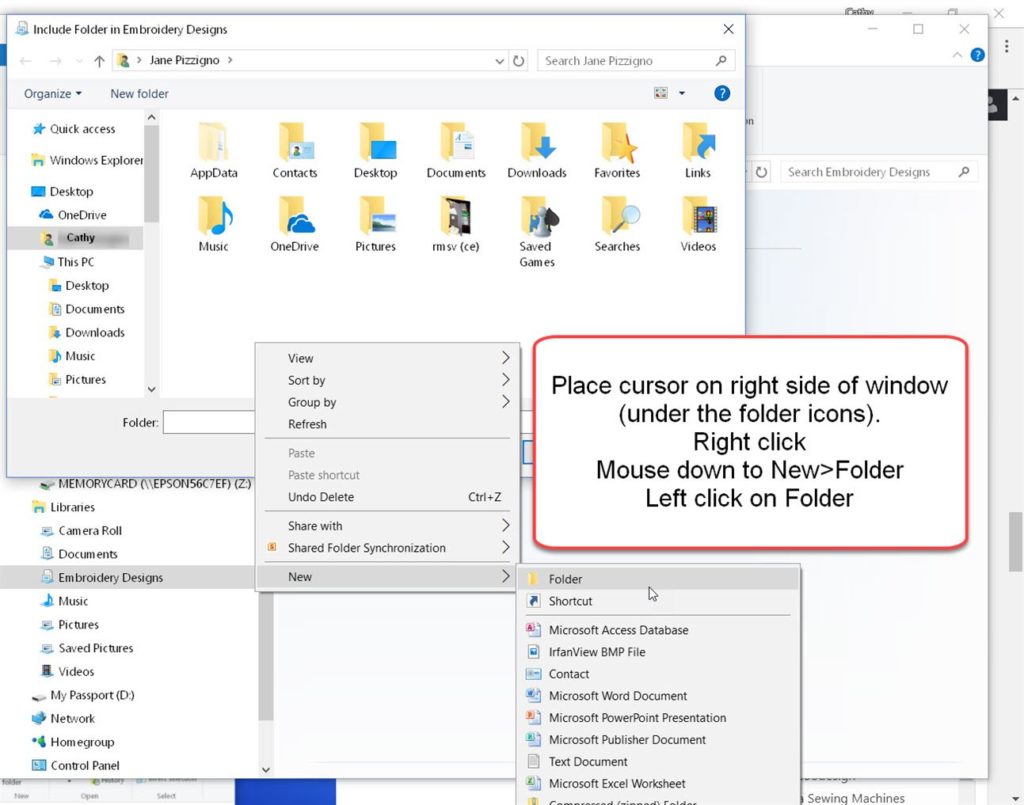
Name this new folder the same name as your library (e.g. “Embroidery Designs”)
This is the folder that all your collections will be copied to. Each collection will be a separate folder.
Great! Your filing cabinet is ready! You have your design library set up, and you can start copying your collections to it.
Manage Embroidery Collections
Categories
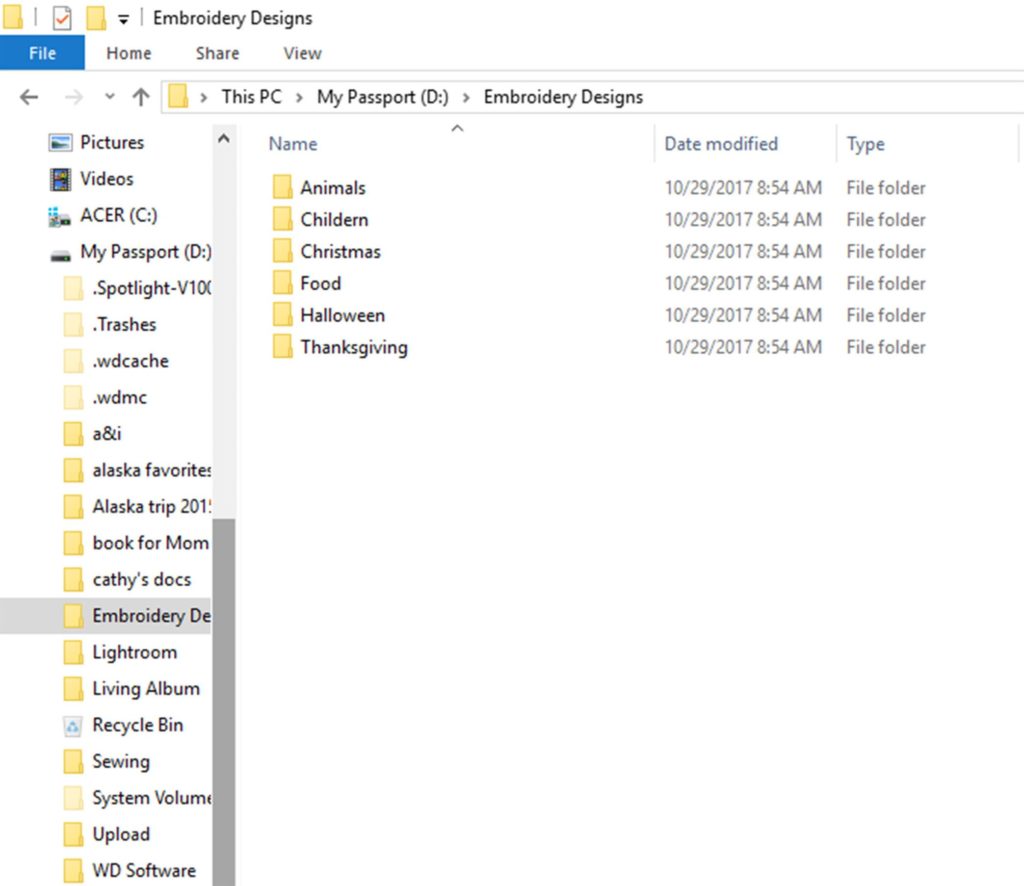
There are many ways to organize and manage embroidery collections. You could create folders for “categories” like Christmas, Halloween, Easter, food, sports, animals, children, etc. Then save the individual collections as appropriate to each folder. You could create folders by designer, like Anita Goodesign, OESD, Floriani, Embroidery Library, etc. Whatever method you use, after you create a category folder, be sure to also create folders for each design collection.
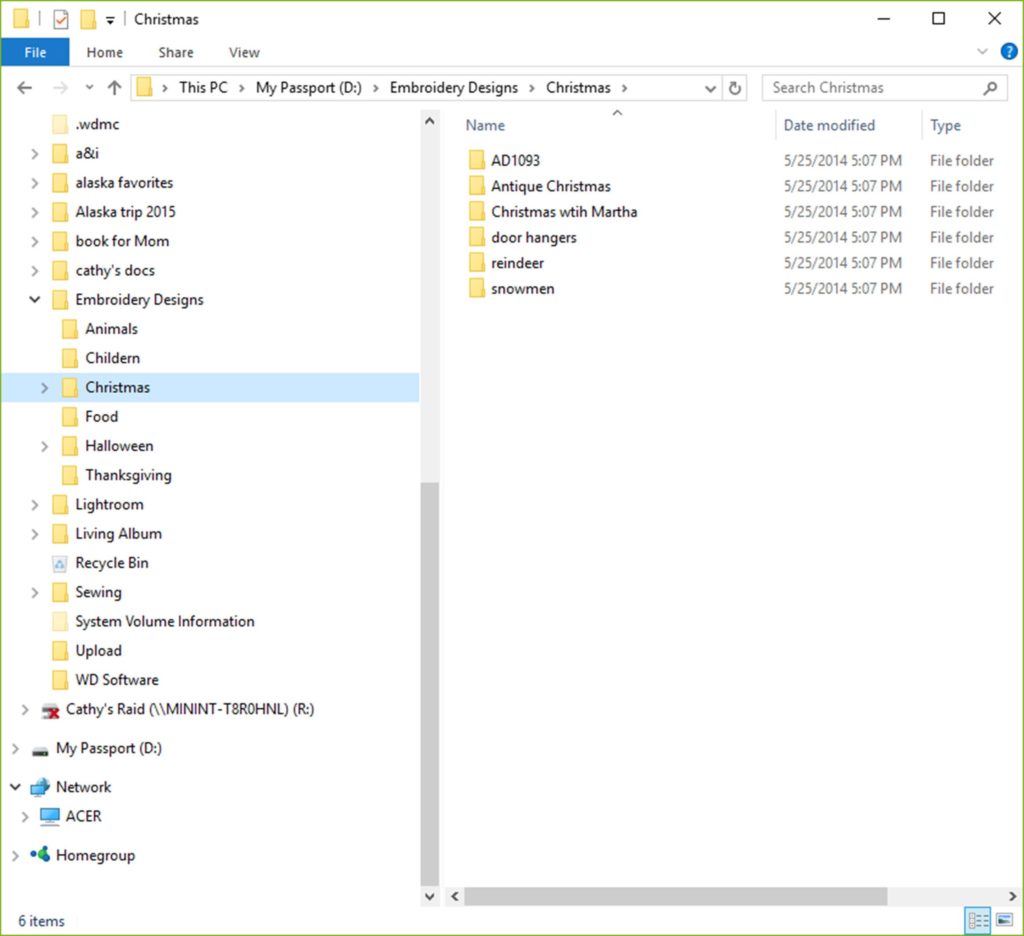
I used to place folders of design collections inside of “category” folder. I had a folder called “Christmas” and placed all Christmas design collections inside that “category” folder. So, when I wanted to find designs, I had to open the category folder, then the design collection folder. A folder like “reindeer”, a sub-folder of Christmas, might then have several more folders inside of different reindeer collections.
Keep It Simple — but Organized!
Naming Folders
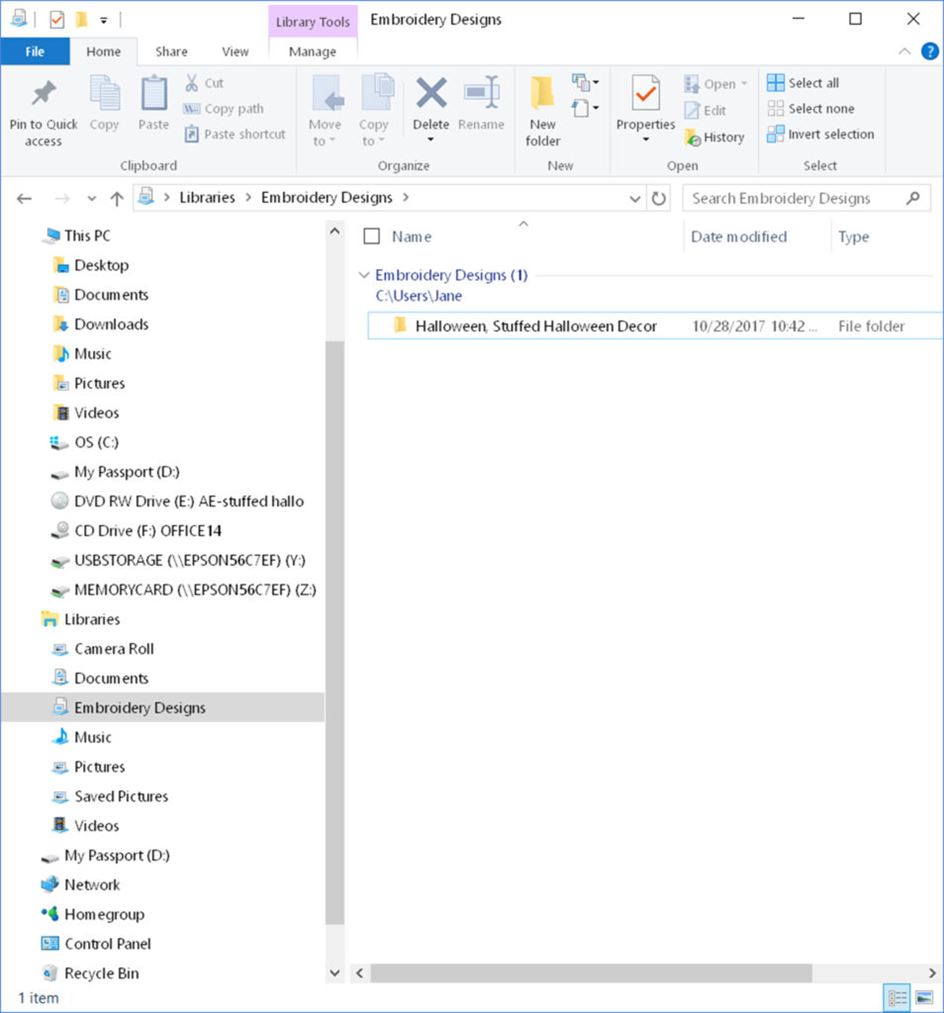
So I’ve reorganized my organization! I decided to just create a folder for each design collection, but NOT file them under different categories. That way when I open the library, I see ALL of the collections without having to drill down further into the folders. When you open Windows File Explorer, usually the files/directories are listed in alphabetical order. When I create the directory for the collection, I either use the collection name, such as “Great Outdoors” or I use a category as the first word of the folder name such as Halloween. That way, when the directories are viewed in File Explorer all of the Halloween collections are listed together, alphabetically. If the collection name starts with the category name, such as Halloween Quilt, no comma is needed.However, for the collection called “Spooky Faces”, I name the directory, “Halloween, Spooky Faces (AG).”
Note, I also put in parenthesis at the end of the folder name the initials of the collection designer, (AG) for Anita Goodesign, (OESD ) for OESD collections (SN) for Smart Needle collections, etc. Collections from Dakota Collectibles or Amazing Designs have a collection number. I put that in the folder name as well (e.g. Garden Jumbo Collection (ADC5006). Having the designer identified on the folder makes it easier to go back the the CD later, if necessary.)

Copy Files to your Library
Create Folder
Put a CD with designs into your computer. Create a folder for the collection in the Embroidery Designs library. In this example, I’ve created a folder called “Halloween, Stuffed Halloween Decor”.
Once you have the folder created on your hard drive, find the designs for your machine on the CD. Copy them to that folder. Providers of embroidery designs have different directory structures on their CDs. Your goal is to find the designs and the sew-out sheets that list the suggested colors and sequence for each design. These sew-out sheets might be .jpg files or .pdf files.
For the purposes of this blog, I’ll show you how to copy files from an Anita Goodesign CD to your library.
Copy Files
The good folks at Anita Goodesign organize all of their CDs essentially the same. Each CD has several directories. Usually there is a catalog directory, a tutorials directory, a designs directory. In some of the older CDs there is a resizing program included with the CD as well.
In the “Designs” directory are sub directories for the different embroidery machines. There is no point in taking up disk space by copying any more files than you need. I recommend you just copy the ones specific for your machine.
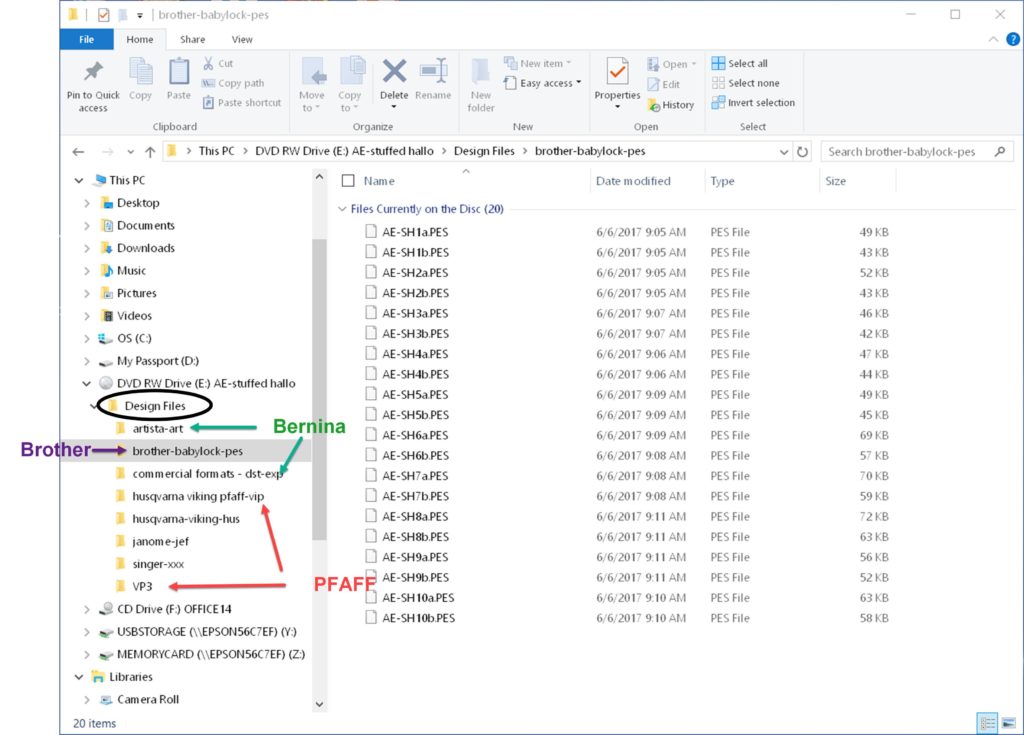
Open the directory with the files for your machine type. I have a Brother machine, so I need the pes files.
There are many ways to get these files from the CD to your PC hard drive.
Copy and Paste
- Open a second window in Windows File Explorer
- Navigate to the directory for the collection in your library
- Switch focus to the File Explorer window showing the CD files.
- Select all design files for your machine.
- You can multi select files by:
- clicking on the first one in the list, holding down the shift key and then clicking on the last file in the list.
- If your File Explorer shows a little check box in the upper left part of the screen above the file names, you can click on that box and it will select all files in the folder.
- Once you have the files selected, right click on the selected files and choose “copy.”
- Switch focus to the File Explorer window showing folder in the library on your hard drive
- Right click in the window and select “paste.”
- You can multi select files by:
Drag and Drop
An alternative way to copy files is to select all the ones you want (as explained above) and then, while holding down the left mouse key, drag them to the location you want. I like to set two File Explorer windows up side by side, one focused on the source of the files and one focused on where I want them copied to. Then it’s easy to just drag them from one screen to the other. As you drag the files, a little popup will appear that shows you where those files are going to go when you release the mouse button. Just be sure to make sure you’ve got them where you want them before releasing the mouse button.

Tutorials
I also go to the tutorials directory on the Anita Goodesign CDs and copy the pdf file that has the tutorials and color sheets for that collection. The name of the collection will be in the file name of the tutorial.
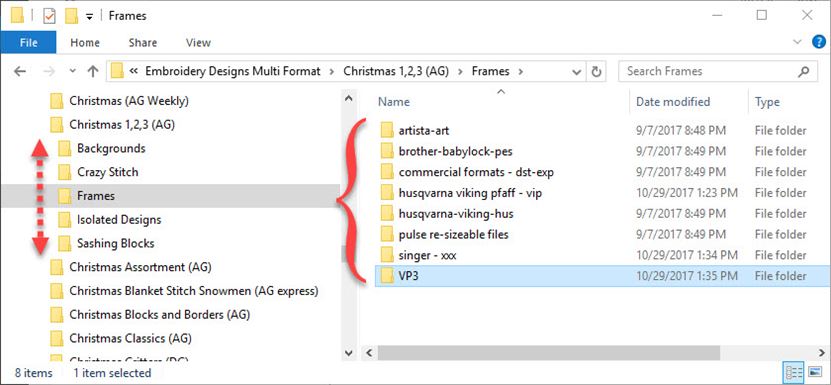
Some of the larger Anita Goodesign like Premium and Premium Plus collections have sub-folders for such things as block size, printed fabric, backgrounds, etc. For example, Christmas 1,2,3 has sub-folders for Background, Crazy Stitch, Frames, etc. Each of these sub-folders has sub-folders for the different machines. It takes a bit of work to get those sub-folders created and to copy just the files you need for your machine.
Use What Works for You
Ultimately, your design filing system will be what works for you. The most difficult part may be in locating all of the existing embroidery designs scattered throughout your hard drive. You may need to search for different embroidery file extensions to find all of them. Wherever the designs are located, click and drag them into their respective folders.
By properly organizing your machine embroidery design files, you will be better able to find them. You’ll know right where to look when you want to use them, even when you can’t remember the exact collection name.
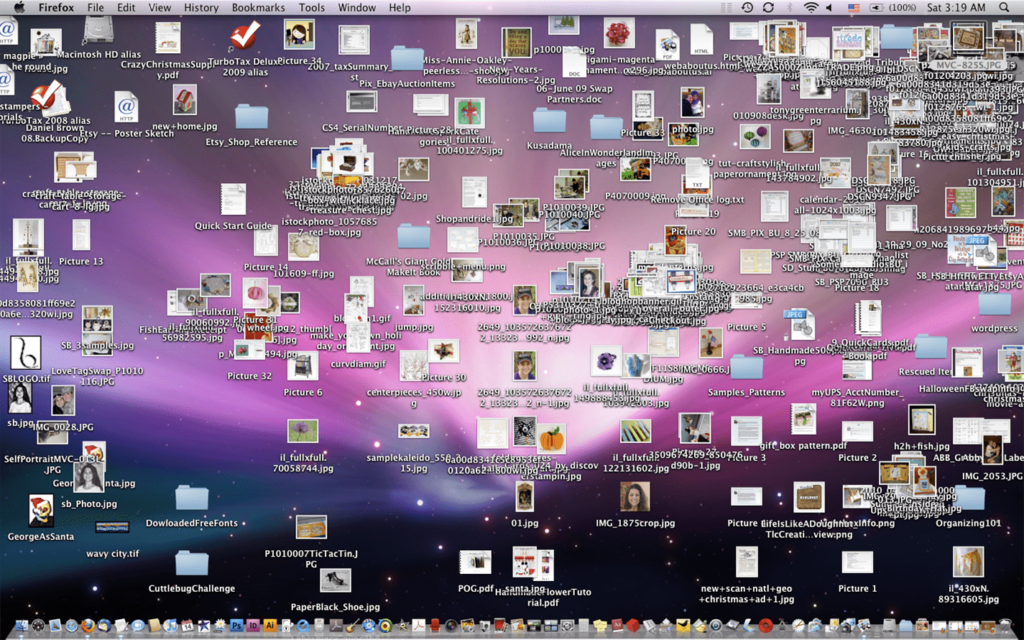
Do be careful not to create shortcuts on your home page for your designs! It might end up looking like this!
Coupon
Now that you’re so organized, you can easily add more designs to your collection! Here’s a coupon for 30% off any embroidery design collection carried in our stores. (Limit two collections; Anita Goodesign Premium and Premium Plus collections not eligible).

Comments
Cathy Ellsaesser
Great meeting you, too, Vicki. Thanks for the comment!
Vicki Perry
Thanks so very much Cathy… Love these tips!!! Now to go back and do this for all my hundreds of designs. By the way, It was great meeting you!!!
Cathy Ellsaesser
Did you add the metadata for the extension of your embroidery files? (ie., pcs for Brother; VIP for PFAFF; Vp3 for Viking, etc.) In the image below, I found the .vp3 extension in the list of extensions of files on my pc and highlighted it (step 1). Then select “simple” for profile (step 2). Next click on “add meta file handler (3). Then update registry (4) and restart explorer (5).

After that, when you right click on a file that’s an embroidery file, go to the details tab on the popup and you should see tags in the list of properties. Click on the word tag or just to the right of it and you can enter your tags.
Hope this helps.
Gina A Nylund
I installed the file meta 1.5 and the tags don’t show in details. I’ve rebooted etc
Cathy Ellsaesser
Although you can tag some files in Windows 10 through File Explorer, that is not the case for every type of file. I had to install a program called File Meta 1.5 and set it up so that the embroidery files (in my case, .pes files) show attributes including tags.
You can download the app here:
File Meta 1.5
Once installed, run the app and Select “Simple” profile from the drop-down.
Then find, and select the extension for which you want to enable tags. .pes for Brother embroidery files/
Next click on Enable File Meta handler.
The extension will become bold.
Select “restart File Explorer”
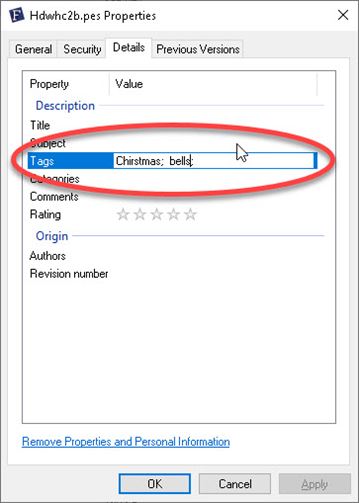
Select the file in File Explorer, right click and select Properties. Select the “Details” tab. One of the properties should be “tags”. Click on tags and type in the tag you want to add to the file.
Note: when you first see the list of properties it does not seem editable,but it is. You just have to click on the word tags”, and start typing the tag/s you want to add.
hope this helps. Happy Sewing.
Gina A Nylund
How do you tag the designs?
Cathy Ellsaesser
Thanks for the great tip, Christine. I use tags for my photographs, but frankly never thought of using them for embroidery files. With my having, literally thousands of embroidery files, the idea of tagging them with the design type is genius! You bet I’ll be doing that for now on!
Christine Swan
I haven’t seen my tip anywhere yet. While I do have my designs filed by collection, I’ve also edited the design file properties with a ‘tag’. I may have butterflies in multiple collections and tagging the design properties with this word enables searching for all designs tagged ‘butterflies’ in whichever folder they may be. A design can have as many tags as you want and you can define any tag.
Cathy Ellsaesser
I agree that having the designs on an external, portable drive is very helpful. External hard drives serve as a backup, AND you can take all your designs with you when you travel. The external drive are about the size of a deck of cards, and come in various capacities including the terabyte range.
I am on a metered internet connection (the only draw back to living in the mountains!) so I don’t use cloud storage much, but it’s a great alternative if you have ready and fast access to the internet.
I really appreciate you comments. Thanks!