Research and development into new hardware may take months or years from concept to market. Despite that, once a new piece of equipment is on the market, the manufacturer receives many suggestions for improvement from users. Often the manufacturers can incorporate those improvements in a firmware update for the equipment. In line with this thinking, Brother released several ScanNCut2 firmware updates that incorporate many new features for the machine.
Update the ScanNCut2 Firmware
Check The Current Firmware
So, do you need to update your ScanNCut2? If you have never performed a firmware update, then I recommend that you do. If you have performed an update but don’t know what version, you can easily check to see what’s on your machine.
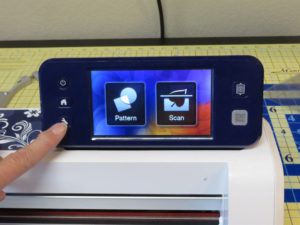
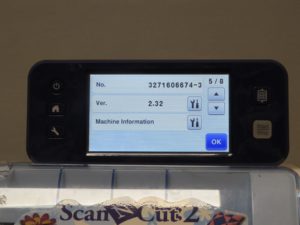
To check the current firmware that is on your ScanNCut2:
Click on the wrench on the lower left of the front panel.
Navigate to page 5 of the settings
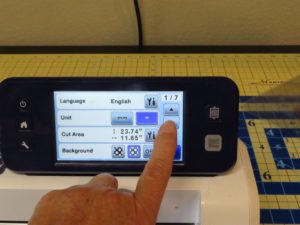
Identify the current firmware version (Ver.)
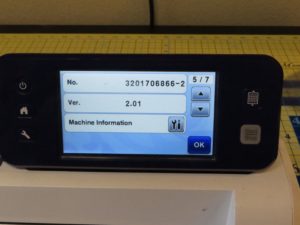
My ScanNCut2 firmware is 2.01. So, I need to update it to Version 2.32.
Download the Current Firmware
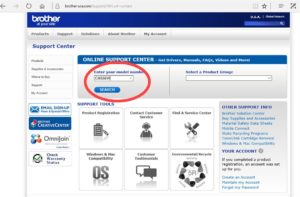
To get the current firmware, go to www.scanncut.com and click on the “Firmware Update” link.

The next screen prompts you to input model number of your ScanNCut. Check the back of your ScanNCut for a silver label. It will have the model number (and serial number) of the ScanNCut.
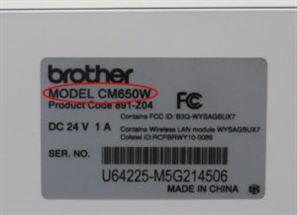
Type the model number into the field as requested by the web page. Mine is CM650W, but yours may be different.
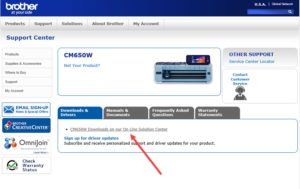
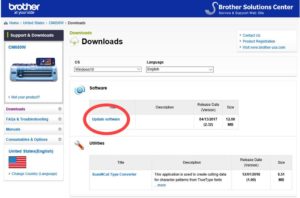
Select the “CM650W downloads in the online solution center” link.
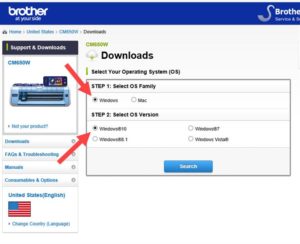
Select your computer operating system and version by clicking on the appropriate radial button. Click on ![]() .
.
Select “Update Software from the page showing the software available for the ScanNCut.
Click on ![]()
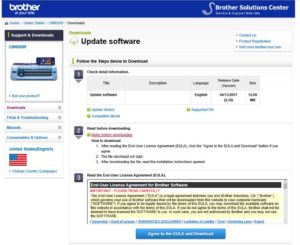
Save downloaded file (SNC20023v232w.upf) to an empty USB stick.
![]()
Load Firmware Update into ScanNCut
Hold the load mat button down and turn on the machine. When you see a white screen, you can release the buttons. (If you continue to press the Power Button after the machine turns on, the machine may shut down. Release your fingers from the buttons when the screen lights up.)
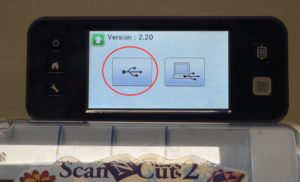
If you haven’t already done so, plug the USB flash drive containing the update file into the USB port on the machine.
Select the left icon (USB symbol) for the USB stick. Note, you can load the firmware update directly from a computer if so desired. If you are doing that, select the right icon (computer with USB symbol).
Touch ![]() (Update key) to start the update.
(Update key) to start the update.
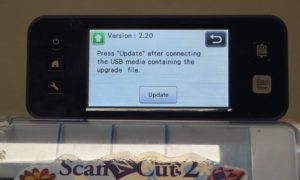
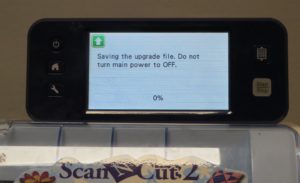
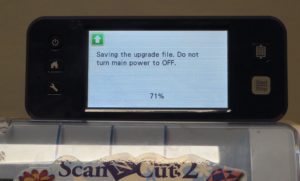
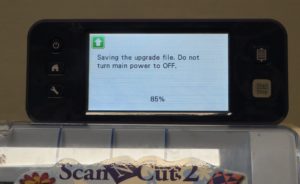
Do not power off the machine while the update is loading. It will take a couple of minutes to load. The percent complete indicator will stay at 71% and then at 85% for a bit as the firmware is loading.
![]()
![]()
When updating is finished, the completion message appears.
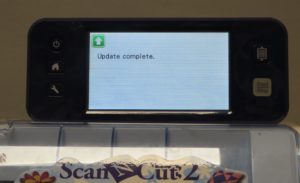
Unplug the USB flash drive from the USB port.
Turn the machine off, then on again (without holding down the “load mat” button).
The machine’s firmware has been updated.
You can check the new version by pushing the wrench button and then navigating to page 5 as when you checked the current firmware at the start.
Click here for a video of the entire update process or print the pdf file with complete instructions.
New Features after ScanNCut2 Firmware Update
Although there have been several ScanNCut2 firmware updates since the machine was introduced, don’t worry if you haven’t installed any of the prior ones. Each firmware update contains the previous update(s) so you only have to load the latest to get all the features available.
Here’s a list of the features added since the machine was released for sale:
Version 2.32 (April 2017)
- Change to version number only / No change in Functionality
Version 2.30 (November 2016)
- Added Automatic Update Function via a wireless network
- Improved minor issues
Version 2.21 (October 2016)
- Improved minor issues
Version 2.20 (August 2016)
The following features were added or changed.
- Specifying an Inside Offset
- Removing Unnecessary Patterns (dots, lines, etc.) in Direct Cut mode
- Trial Cutting in Direct Cut mode
- Previewing in Grayscale Recognition Mode of either “Direct Cut” or “Scan to Cut Data” mode
- Using Drawing Functions to Fill Patterns/Make Outlines Thicker
- Flipping Multiple Patterns
- Additional Features of the Draw/Cut Selection Screen:
1. Settings key to adjust pressure and speed for the Draw or Cut
2. Display the remaining time of the Draw or Cut. - Mat Size Keys to switch the mat size in Settings screen or Scan to USB mode
- Premium functions
- Using the “Direct Cut” Mode with ScanNCutCanvas
- Sending an Image to ScanNCutCanvas
- Automatic Update Function via a wireless network
- Saving up to 12 Wireless LAN Connection Settings
- Improved minor issues
For the details of the above features, refer to Updated Operational Features of version 2.20 that details the additional features that were released in firmware update 2.20.
Version 2.10 (February 2016)
The following features were added or changed.
-
- Grouping/Ungrouping Patterns
- Aligning Patterns
- Specifying “Blade Adjustment Area”
- 12″x 24″ Scanning Mat (Sold Separately)
- Improved minor issues
For the details of the above features, refer to Updated Operational Features of version 2.10
But Wait…I Have the Original ScanNCut
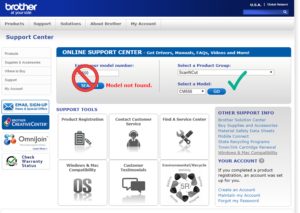
No worries! There is a firmware update for the original ScanNCut as well. I had model CM550 (and later upgraded to the CM650W) but I’m sure many people still have the 550 model. For some reason, when you type in CM550 on the update page, it returns a message that the “model not found.” So if you want to update the firmware for the CM550, search for model number on the update page and then select the CM550. That works! Then follow the same process as described above for the ScanNCut2.
Cut It Out!
In future blogs I’ll showcase some of the incredible abilities of the ScanNCut2, including the wireless capabilities, drawing and grouping functions, and use of ScanNCut Canvas.
In the meantime, update your ScanNCut and continue creating. If you need supplies like mats or cutting knives, stop by your local Rocky Mountain Sewing and Vacuum and pick some up. Here’s a coupon just for that!
