In my previous blog, In a Bind About Binding: Three Ways to Cut Fabric Binding Strips, I described three ways to cut fabric to create binding. Bias binding came out as the “binding champion” in terms of functionality (can be sewn on a curve) and durability (more threads on the fold of the binding). If you need to make bias binding, and just cut strips on the bias, there could be significant waste of fabric. In addition, as you cut the strips away from the center of the fabric, you end up with smaller and smaller pieces to sew together (or discard). In this blog, I will show you how you can make a length of continuous bias binding that uses all your fabric (no waste) by just sewing two seams.
Continuous Bias Binding
It’s Hip To Be Square
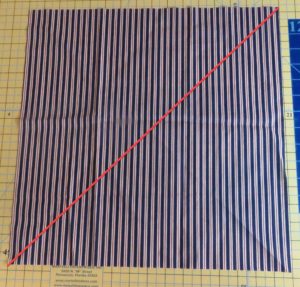
Let’s start with a square of fabric.
Cut the square in two pieces by cutting from upper corner to lower corner on the opposite side. This will give you two right triangles.
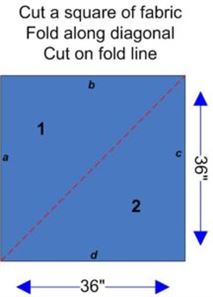
Rotate one triangle, right side up, by 90° and turn the other piece wrong side up and position as illustrated below.
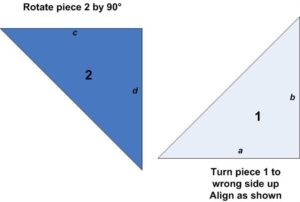
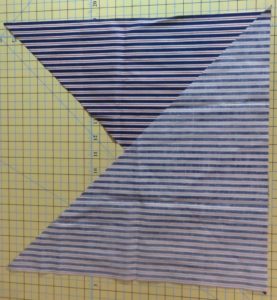
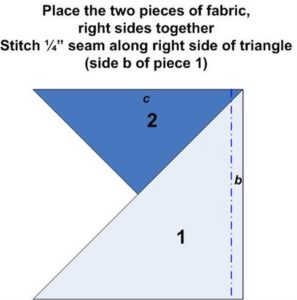
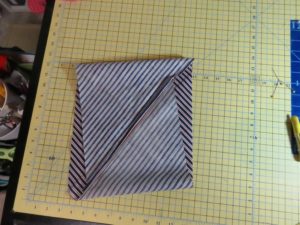
Place the two pieces of fabric right sides together matching sides “d” and “b” as shown below. Sew a ¼”seam. This is seam #1. If you are using striped material match the stripes as close as possible.
Parallel Lines
Press seam open. trim tails at end of seam. You now have a parallelogram.
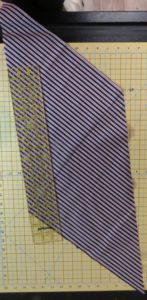
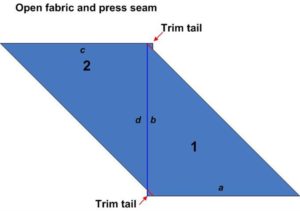
Draw parallel lines along the bias that are spaced apart the desired width of the continuous bias binding. Trim away any fabric “left over” after you’ve drawn all your lines so that the last row is the width you need.
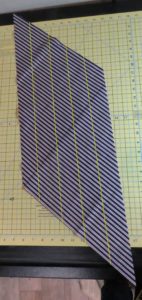
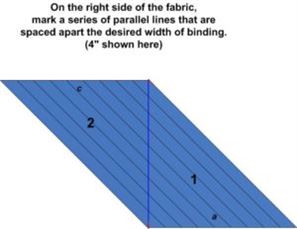
I like to draw the lines on the right side of the fabric (with chalk) so that when put right sides together for the seam, it’s to “align the lines.”
Make a Tube
Bring right sides “a” and “c” together to make a tube. Cut 4-6″ along the line of the first row.
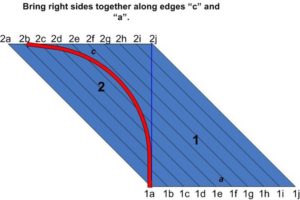
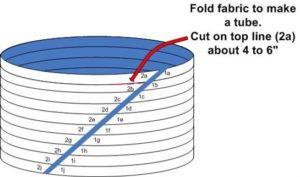
Offset rows by one so that row 1a aligns with 2b, 1b aligns with 2c, etc. Bring right sides together and sew a ¼” seam. (This is seam #2.)
Note: aligning the edges will be a little awkward for smaller squares of fabric. Just work with it to get a good seam line pinned and then sew.
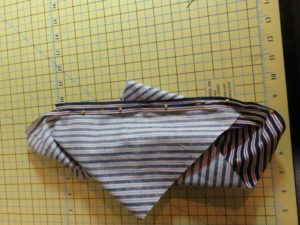
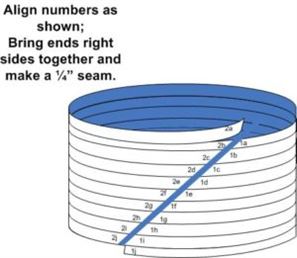
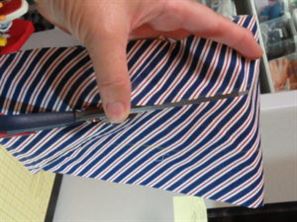
After sewing the seam, cut along the lines you have drawn, starting where you cut 4-6″ between 2a and 2b and continuing around the tube in a spiral fashion.
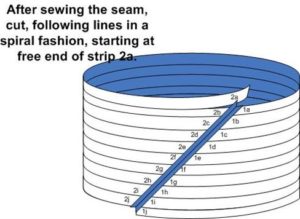
Once you have cut all the way around, you’ll have a strip of continuous bias binding made by just sewing two seams together! (Note how the stripes line up from seam #1.)
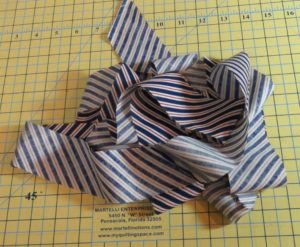
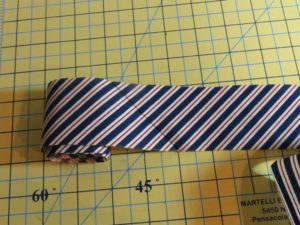
Here’s a really good two-part video tutorial by Marian Drain on how to make continuous bias binding.
Rectangles Can Be Fun, Too
For ease of explaining and illustrating how to make continuous bias binding, I used a square of fabric. However, you can use a rectangle as well. The process is the same, but the first two steps just look a little different.
Let’s look at an example of a piece of fabric that is the entire width of fabric (wof, ~43″) and one yard in length.
Fold the fabric on a 45° angle aligning the left edge of the fabric (b) with the bottom edge (d), creating a right triangle. Since the fabric is wider than it is long, there will be a section of fabric that is not covered by the triangle (grey area to the right in the illustration below.)
Cut along the fold line.
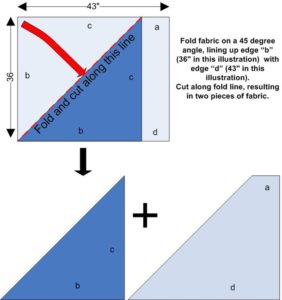
Flip the triangle so that side “b” is at the top. With right sides together, sew the two pieces together to make a parallelogram.
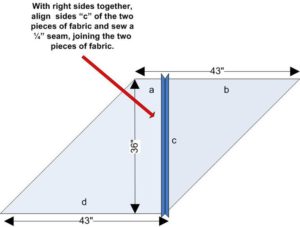
Mark parallel lines on the bias, spaced as needed for your binding. Then continue to make the tube of fabric and cut along the lines as described above.
Look Out! Here’s the Math Part
It is easy to calculate the amount of fabric you need to create the length of binding for your project.
From a Square of Fabric
Formula
Length of bias needed (l) x width of bias (w) = square inches of fabric needed (s).
Square root (√) of square inches needed (s) = size of square needed to start ((sq)round up to nearest inch)
sq = √(l x w)
Example
To get 300 inches of 3″ bias binding:
sq = √(300 x 3)
sq = 30
So you need a 30″ square to make 300″ of 3″ continuous bias binding.
From a Rectangle of Fabric
Formula
Length of bias needed (l) x width of bias (w) = square inches of fabric needed (s).
Square inches of fabric needed (s) ÷ fabric width (fw) = amt of fabric needed in inches (fni)
Amount of fabric needed in inches (fni) ÷ 36 = amount of fabric needed in yards (fny)
fny= ((l x w) ÷ fw) ÷ 36
Example
To get 300 inches of 3″ bias binding from a piece of fabric that is 43″ wide:
(300 x 3) ÷ 43 = 20.9 inches (round up to 21)
21 inches/36 = 0.588 yards (round up to 5/8 of a yard)
So you need 5/8 of a piece of fabric that is 43″ (wof) wide.
If You Hate Math
For all you math haters out there, click here for a table that lists what size of square you need to make continuous bias binding of different lengths and widths. (Sorry, I didn’t provide a table for using width of fabric rectangles. You’ll have to do that math!) As a bonus to the table, I’ve included the drawings and formulas provided in this blog. Print the pdf and keep it handy in your sewing room.
I’ve Got This Strip of Continuous Bias Binding, Now What?
How you use the strip of continuous bias binding you made will vary depending on its use. You can use it as quilt binding, hot pad binding, baby bib binding, sleeve binding, neckline binding, wide binding, narrow binding, single fold binding, double fold binding, etc.
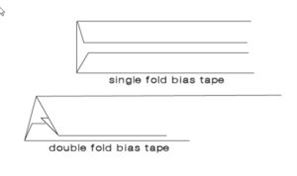
Single Fold Bias Binding
Fold single fold bias binding once each edge, toward the center on the wrong side. This makes a bias tape that can be attached to the right side of a project and folded to the wrong side, then stitched down. Single fold bias binding is great for surface embellishment. It also works great for finishing underarms or making hems.
Double Fold Bias Binding
Double fold tape is single-fold bias tape that has been folded again down the center, making a clamshell shape that can be used to trap seam allowances in the middle and sealing them tight It is also used to bind the edges of quilts and other craft or sewing projects.
A Cool Tool
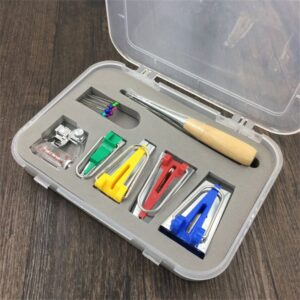
In the August Sew Fun sessions, Tracey showed us a bias tape kit that makes it easy to create single fold binding of different widths using tips and an iron that help fold and crease the fabric. The kit:
- Has a set of 4 Bias Tape Makers with Tape Binding Presser Foot
- Includes 4 sizes to make single fold binding that is 1/4″ (6mm) GREEN 1/2″ (12mm) YELLOW 3/4″ (18mm) RED 1″ (25mm) BLUE
- Also includes 1 Awl, Adjustable Snap on Bias Binder Foot (for low shank machines), Ball Point Pins, 4 pieces wonder clips
- Houses all items in a plastic box with foam, so that they do not rattle or fall off when travelling
Check with your local Rocky Mountain Sewing and Vacuum store for one of these kits.
Now, go create some continuous bias binding!

Comments
Nancy Bode
Nicely explained! Quick and easy. I learned to make a continuous bias over 50 years ago and needed it after all these years. I taught Home Economics and Mathematics and enjoy tying the two areas together. I am making a taffeta tartan plaid tree skirt and want to put 3/4 binding on its edge. I used to make everything but lately its just hemming. I wanted a challenge. Thank you!
Cathy Ellsaesser
I clicked on the link in the blog and it does bring up the pdf file so please try again. Just click on the link in the article or try it here:
Continuous Binding Instructions
Hope this helps! Happy sewing!
Gail LeCompte
I would love to download the pdf for your bias cutting! But I can’t find it!
Fannie Reyna
Love your sewing ideas…
carol szemiot
Thank for this great tutorial. Very thorough. Great images. I understand now.
Understanding, Making, and Using Binding Tape - Dalmatian DIY
[…] Optional: If joining, sew the strips together. To do this with minimum bulk on the finished project, the strips are usually joined on a diagonal. This can be done individually to join the ends of each strip or (for a bias binding) the fabric and be pre-sewn and then cut as a continuous strip. […]
Top 10 Scrap Busting Patterns | Sewstainability
[…] more I could have included but very often this is my favourite way of using up scraps. I like to use this tutorial so that I can use rectangular scraps (lots of tutorials recommend you start with a square which […]
Ideas For #sewingleftovers | Sewstainability
[…] ways you can turn small bits of fabric into useable pieces. My favourite bias binding tutorial is this one because it uses the continuous method but clearly explains how to make it work for rectangular […]