
The holidays are coming, and I love to decorate for Christmas. Combine that with the fact that I enjoy making pillows, and you can guess Christmas pillows decorate my sofa. Whether for your bed or sofa or to toss on the floor, pillow covers are really easy to make. So for today’s blog, I thought I’d show you how to make a Christmas pillow cover.
A Christmas Pillow
This pillow cover is made of linen and is certainly more for decor than function. However, I had stitched this design out on linen to make a hand towel, but thought the design was too big for a tea towel. Thus, the pillow!
The design is from Anita Goodesign’s collection called Christmas Reverse Cutwork. If your local Rocky Mountain Sewing and Vacuum doesn’t have this design on hand, they can order it for you. The design collection comes with great instructions on how to do reverse cutwork.
I made an 18″ Christmas pillow with the embroidered linen for the top, the fabric that’s in the applique for the back and gold cord in the seam. Since I like to be able to change out my pillow covers for different seasons, I put a zipper in the bottom seam.
Prep work
If you like your pillow to look “stuffed,” then cut the fabric for the pillow smaller than the pillow form. Thus, for a 18″ pillow, cut a 17″ square out of the top and back fabrics. The finished pillow cover will be 16″ with a ½” seam. This fills nicely with an 18″ pillow form quite nicely.
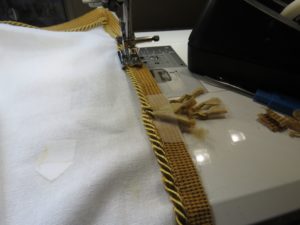
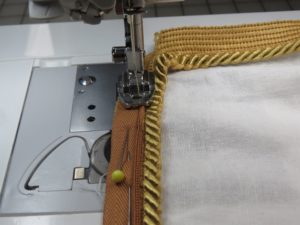
Attaching the cording
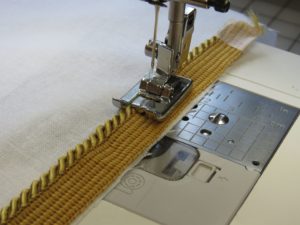
Cut your cording about 2″ longer than you need.
Stitch your cording to the pillow cover. I used a piping foot with grooves on the bottom for the cording to ride in while the flange is being sewn to edge of the fabric. (You can also use a zipper foot that helps you get close to the cording.)
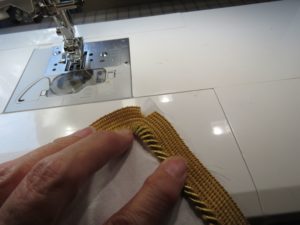
Turning the corner
As you sew down the side of the fabric, stop ½ inch from the corner. (If making a ½” seam.) Leave your needle down and bend your cording around the the next side of the fabric. (Just like making a 45° miter.)
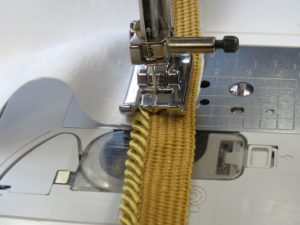
Pivot to the next side, pulling the cording out of the way and sew down the next side, then repeat as you reach the other three corners.
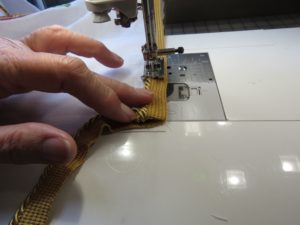
Joining the Ends
Leave a 1-2″ gap between the start of your stitching the cording to the fabric and the end.
Unravel the both ends of the cording. Quickly tape the ends of each braid separately, so if the braid is made of 3 different cords woven together, you tape all 6 ends. It is important to tape the ends because the braids that make up the cord are twisted and easily become unraveled if they’re not taped. If this happens, it’s very difficult to join the two ends.
Once you have taped the ends, clip the cording from the flange to where your stitching begins and ends
Untwist the cording on the one side and flatten them out, with the ends of the cording heading downward toward the flange.
On the other side, untwist the cording and flatten them out so that they lie over the other cords. Be careful not to unwind too much. You want to be sure that you unwind only enough cord only enough to lay over and join the bottom cord where it starts to separate. If you unwind too much, you will see a gap in your finished cord. If you unwind too little, your finished cord will look cramped and uneven.
Machine stitch over the ends of the cording and the flange.
If you are careful with the amount of cord you’ve unraveled and the placement, once you sew the ends and the flange to the seam allowance, you will not be able to see where you joined the cord.
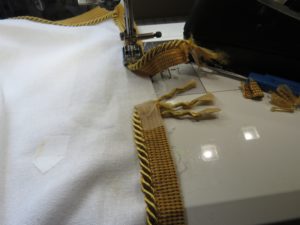
Note, if you have multi color cording, the colors may not always line up exactly. Take a look at this video to see a great example of matching up multi color cording.

Clip the corners of the flange to help the cording make a nice curve around the corner of the pillow.
Adding the zipper
There are several different ways to add a zipper to the pillow, but I like the invisible zipper the best. Don’t be intimidated by invisible zippers. They are actually quite easy to install, especially if you have an “invisible zipper” foot.
Prep the Zipper
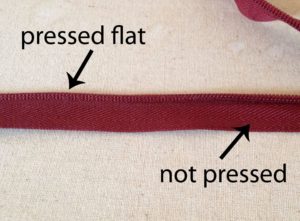
You have to flatten the zipper teeth of an invisible zipper before sewing it. Simply open the zipper and, from the wrong side, iron the zipper coils flat. Use a synthetic setting on the iron so you don’t melt the coils.
Attach Zipper to Back of the Pillow
Unlike the installation of a lapped zipper or a centered zipper, you do not baste the seam closed where you are going to install the zipper.
Center the zipper tape between the two corners of the bottom of the fabric to be used for the back of the pillow. (Right sides together). I used a 12″ zipper, so I came down two inches from the corner to begin the zipper.
Align the edge of zipper even with edge of seam.
Make sure the coils of the zipper are in the left groove of the zipper foot. The needle is in the center position.
Sew along the zipper tape until you reach the zipper pull and can go no further.
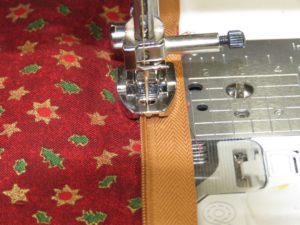
Attach Zipper to the Front of the Pillow
Sew the zipper tape right sides together to the bottom seam allowance of the pillow top. Be sure to start at the same spot on the top of the pillow as you started on the back of the pillow, (i.e. 2″ for my pillow).
The front of the pillow has the cording sewn in the seam allowance, and this makes sewing the zipper tape just a little tricky. You want to make sure that the coils stay in the groove on the foot. You also want to make sure the coils stay “snug” against the cording.

If you have problems with the zipper getting pushed to the side because of the cording, you can switch to a regular zipper foot to get close to the coils. This will keep the machine foot off of the cording. Just make sure you don’t sew over the zipper coils.
Sew down to the zipper foot as far as you can go.
Closing the Seam
Since you cannot sew down past the zipper foot when installing the invisible zipper, you have to attach the bottom part of the zipper to the pillow in a separate step.
Close the zipper and fold the top and back of the pillow right sides together with the zipper at the bottom of the pillow.
Place a regular zipper foot on your machine.
With the needle on the left side of the zipper foot, sew a ½” seam from the corner to just past the zipper pull. This closes the seam where there is no zipper and attaches the zipper to the seam around the zipper pull.
Finishing the Christmas Pillow Cover
Open the zipper.
Sew the rest of the way around the pillow, joining the top and the back of the pillow.
Turn the pillow cover right side out.
Insert the pillow form.
Close the zipper.

Yea! A beautiful Christmas Pillow.
Your Turn
Try your hand at making a pillow cover. We’d love to see your creations. Just click on the “Choose File” button in the comments section below.
Here’s a coupon to get 30% off piping feet and/or an invisible zipper foot from your Rocky Mountain Sewing and Vacuum store.

Comments
Cathy Ellsaesser
Thanks for the feedback! Be sure to let me know if there are any topics or questions you’d like to see addressed in the blog. Happy Sewing!
Kathleen Majlinger
Thank you for the great ideas., Kathleen