
I am making a quilt for my granddaughter and wanted one of the quilt blocks to be a floral peacock from the Anita Goodesign Floral Animals collection. Since I am making the quilt blocks in the hoop, I also wanted machine stippling around the peacock. The Brother Dream Machine2 makes it a snap to add stippling around a embroidery design right there at the machine. But I don’t have a Dream Machine, so I am using the Floriani FTC-U program to create the block with the peacock and add stippling around it.
So let’s create a block with a floral peacock and with stippling filling the block around the peacock.
Open the Embroidery Design
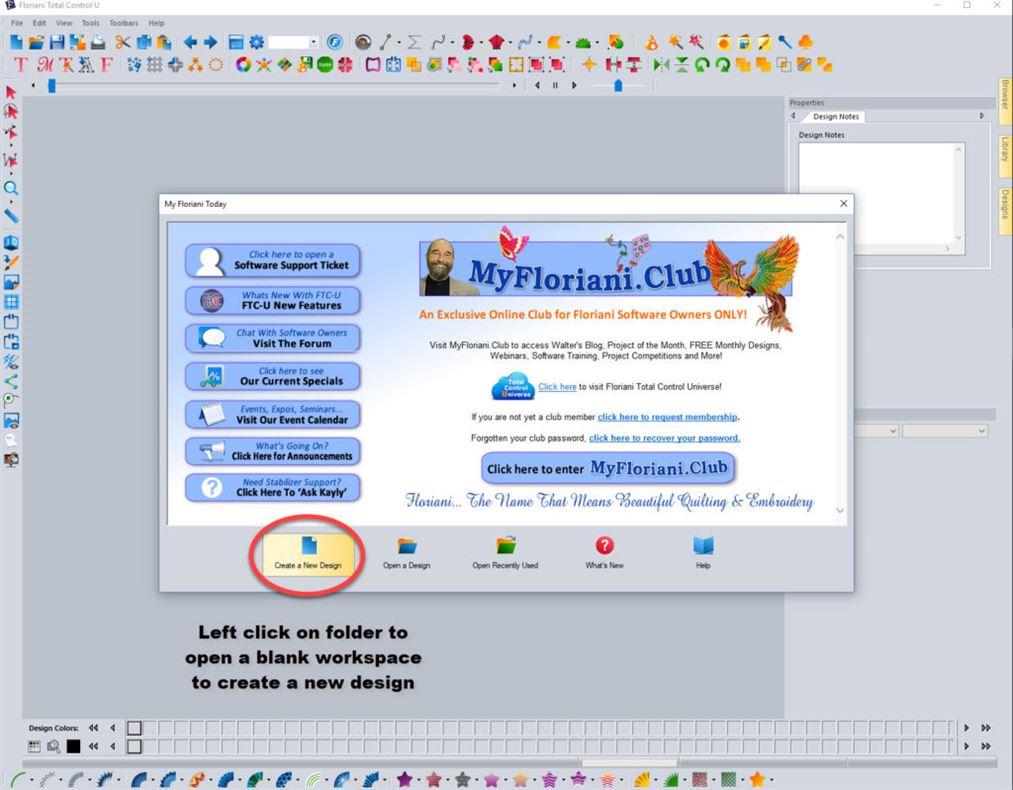
Open the FTC-U program and select Create a New Design icon at the bottom of the opening panel. I like to work with a new design, even though I am going to open an existing design. I do that so that when I save my work, I don’t run the risk of overwriting the original design.
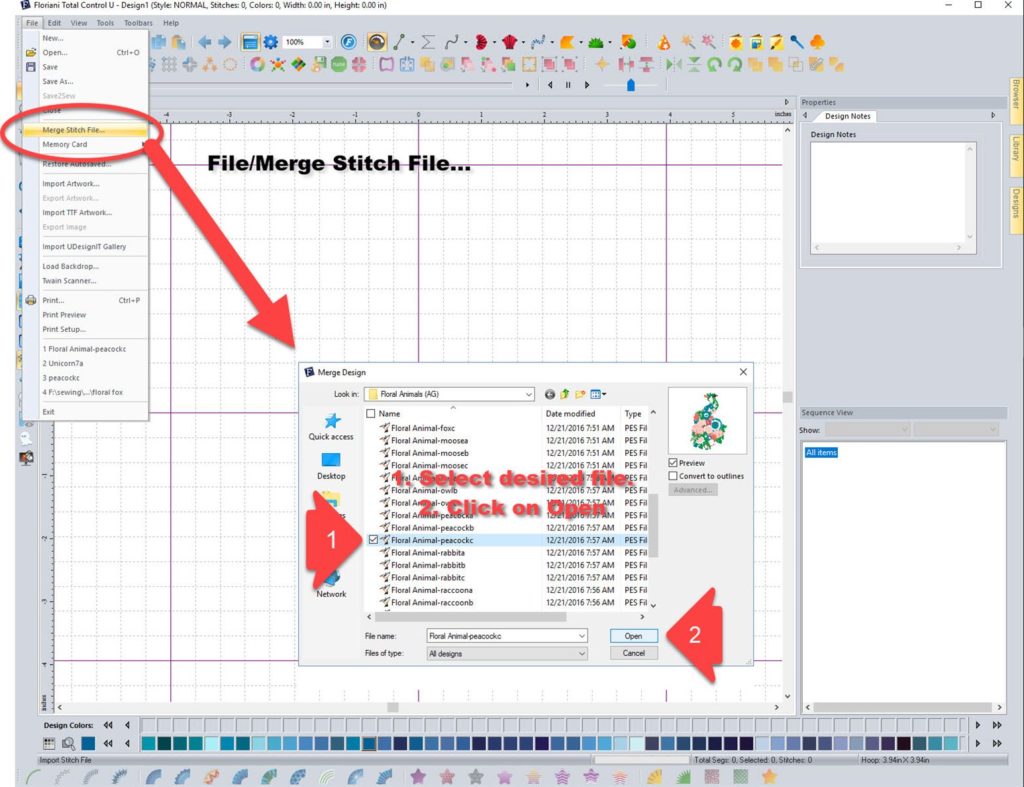
From the newly-created workspace, click on Merge Stitch File in the File menu. Browse for and open the embroidery file you want to use. Be sure that it fits in your planned block. For my purposes, I will have a block size that’s 8 x 11, and I am using the “Floral Animal-Peacockc.pes” file which is 6.7″ x 10.46″.
Create Outline
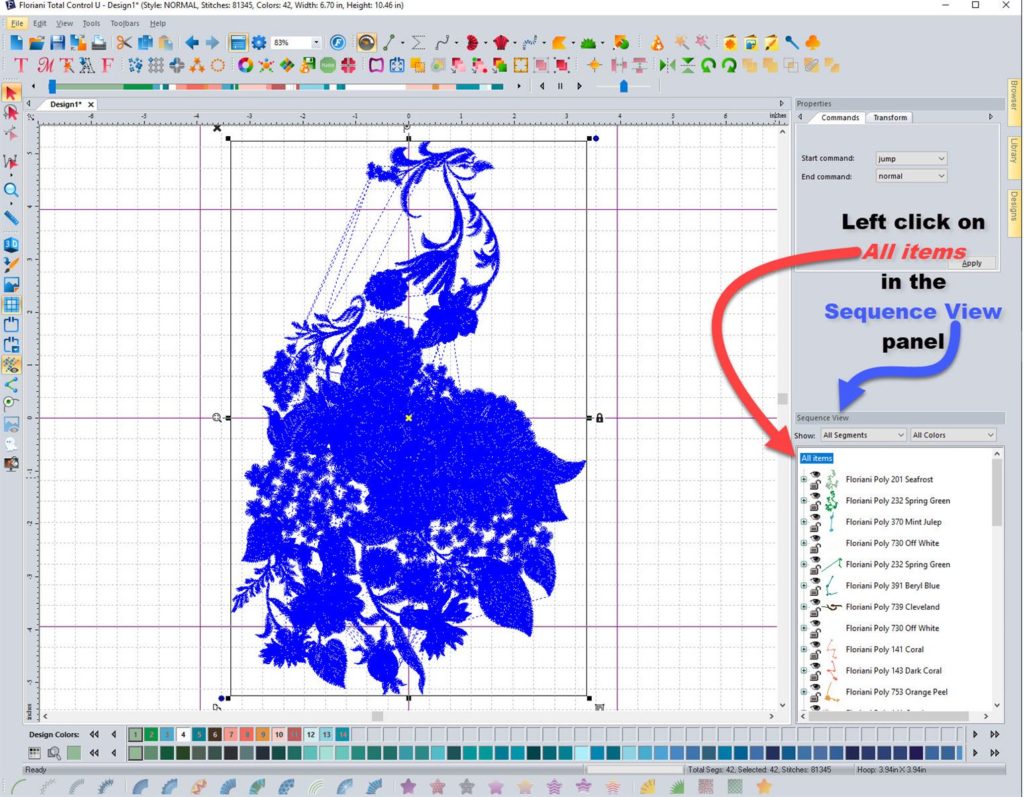
Once you have loaded the design, select All items from the Sequence View.
Convert Peacock to Outlines
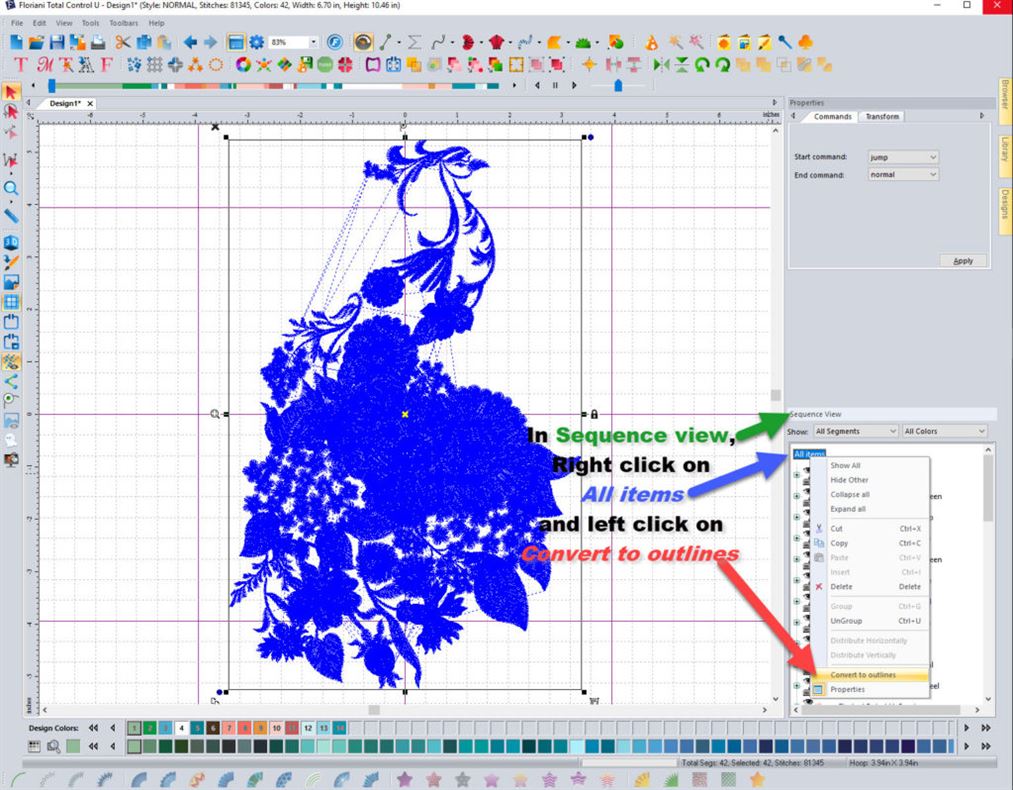
Right click while your cursor is on All items and select (left click) Convert to outlines in the popup menu. (Converting will take several seconds to complete).
Create Outline Around Peacock
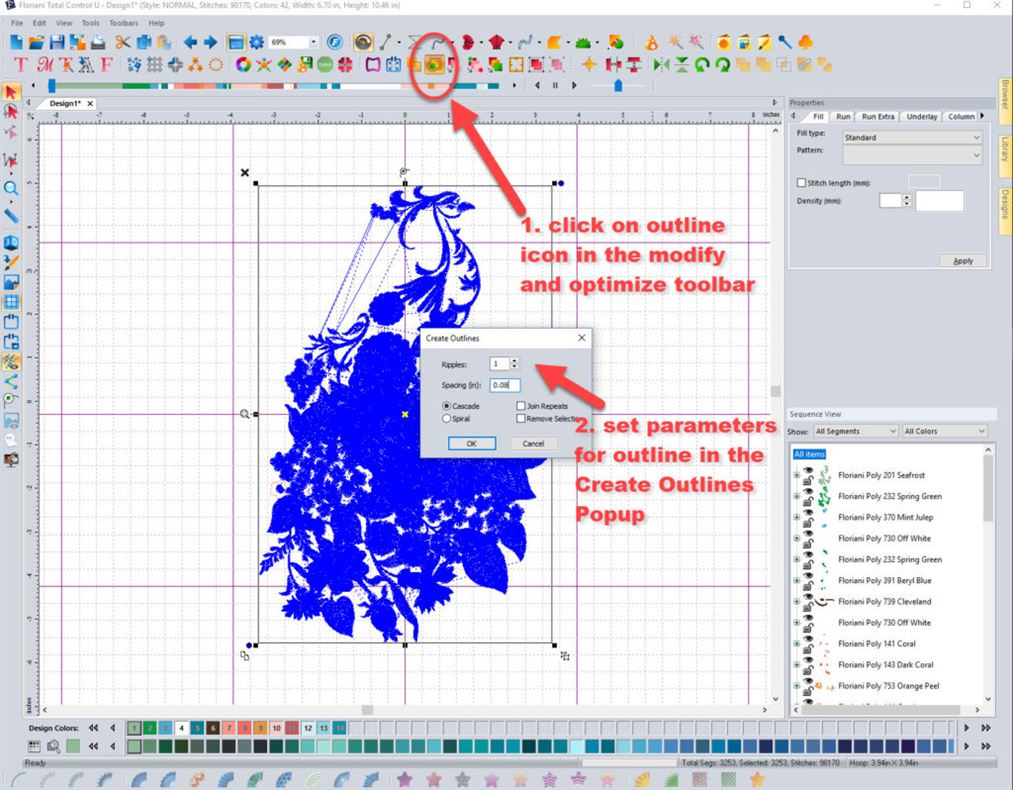
Once the conversion is complete, go to the top menu bar and left click on the outline icon ![]() . (Make sure All items is still selected in the Sequence View). Select the distance from the peacock that you want the outline. I have selected 0.15 in. For a simple outline around an embroidery object, the distance parameter is the only one that needs to be addressed. The other parameters are for creating multiple echo stitches around the embroidery object. After a few seconds, you will get an outline of the peacock.
. (Make sure All items is still selected in the Sequence View). Select the distance from the peacock that you want the outline. I have selected 0.15 in. For a simple outline around an embroidery object, the distance parameter is the only one that needs to be addressed. The other parameters are for creating multiple echo stitches around the embroidery object. After a few seconds, you will get an outline of the peacock.
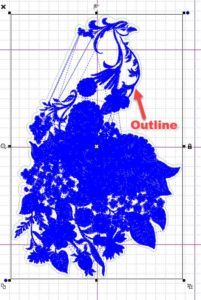
I like to change the color of the outline so I can see it better. To do this, simply select the outline in the Sequence View and then select a color from the palette at the bottom of the screen.
Edit Outline
The jump stitches that are showing in the design around the peacock’s neck force the outline to be outside those jump stitches. If you want the outline to follow more closely the profile of the bird, (or whatever object you are using), adjust the outline manually.
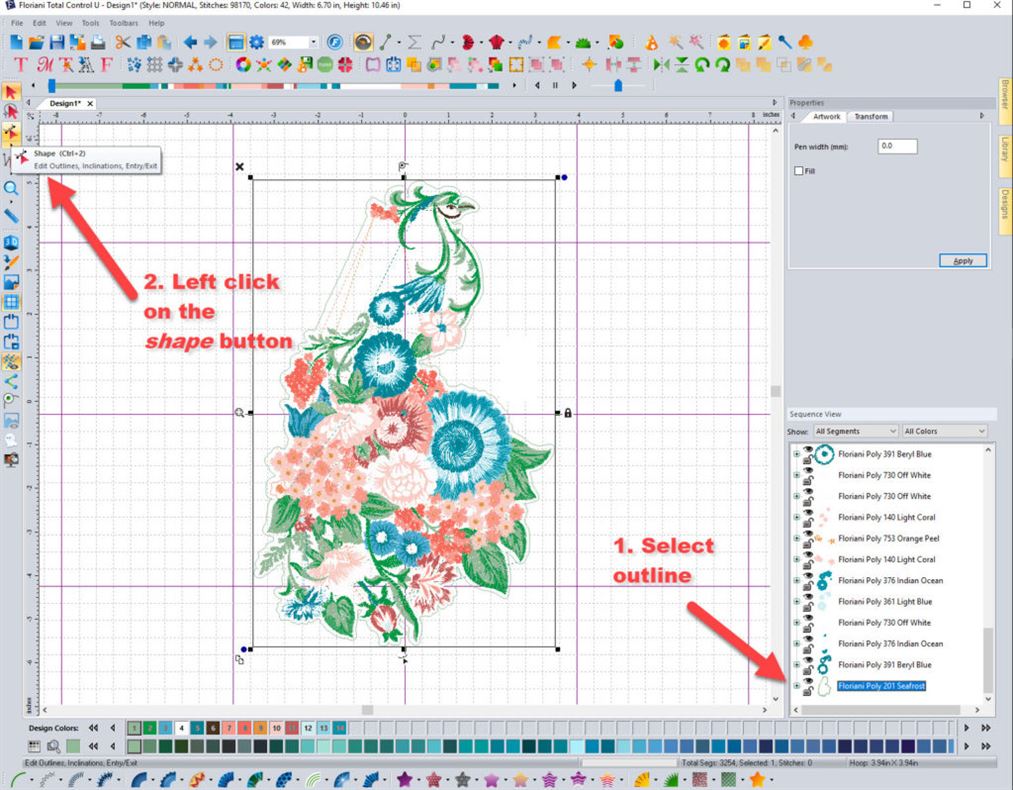
To adjust the outline, select it in the Sequence View then click on the Shape icon ![]() on the left side of the screen in the Edit toolbar.
on the left side of the screen in the Edit toolbar.
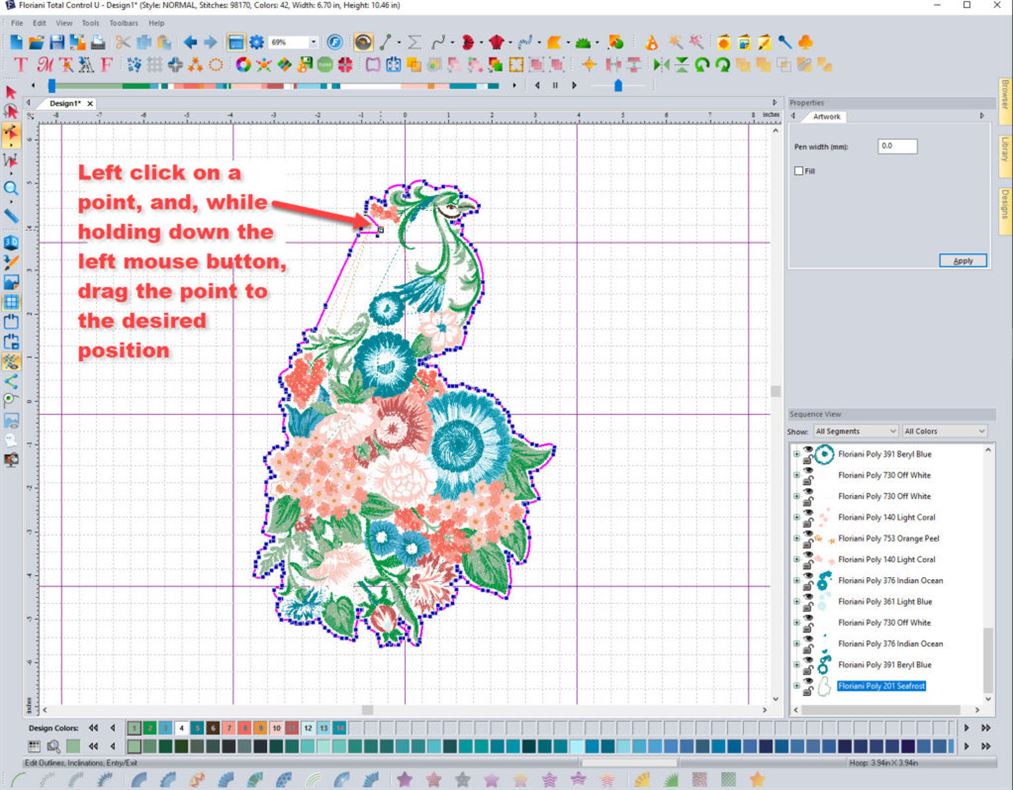
A series of points will be displayed on the outline you created. These points define how the outline is drawn. So, by moving the points around, you can change the shape of the outline.
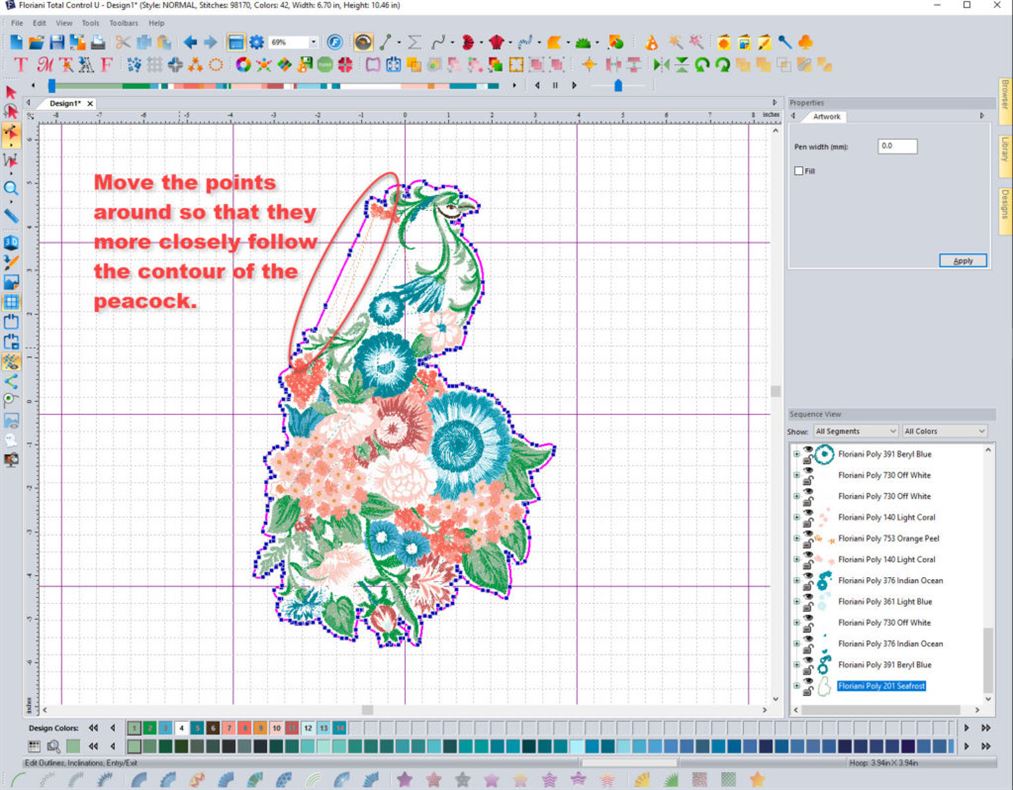
To bring outline closer to the peacock in the upper left quadrant around the neck, left click on a point, then, while holding down the left mouse button, drag the point closer to the peacock.
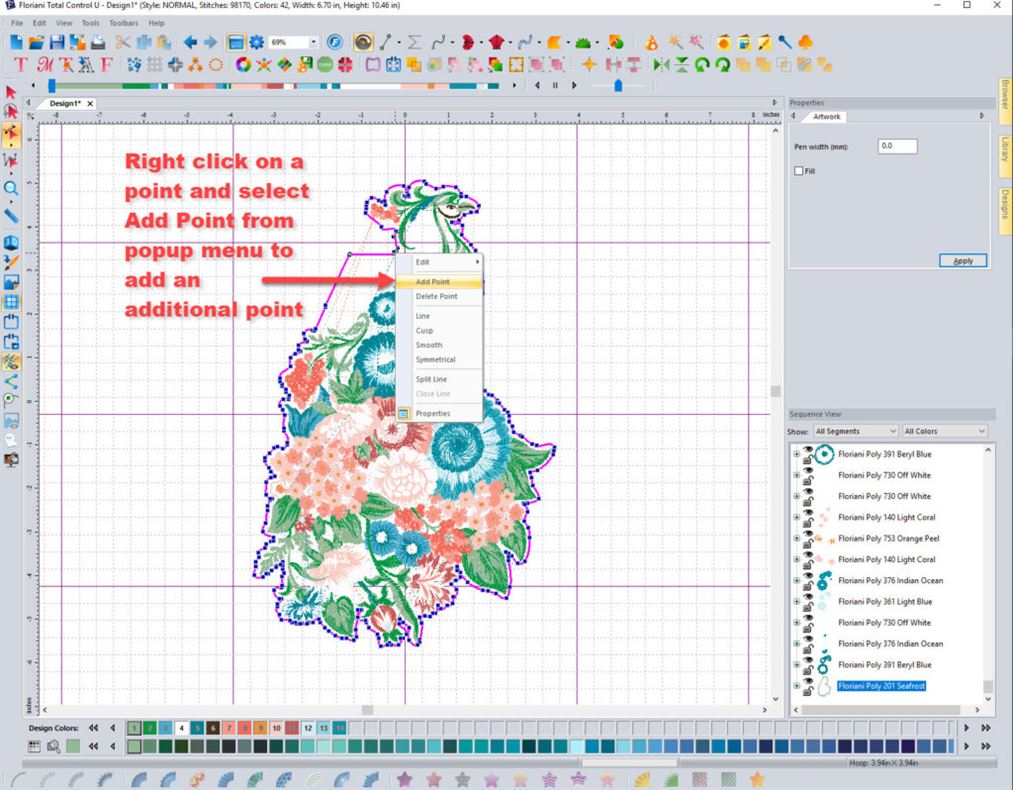
If there are not enough points to get close to the peacock as you’d like, right click on a point and select Add point as needed to get enough to move around to achieve the desired outline. When you move points around, make sure the lines don’t cross over one another.

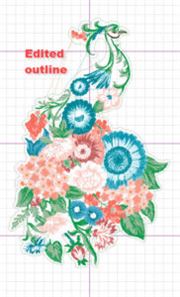
Once you the desired outline you are ready to add the block and stippling.
Stippling
Create Block Shape
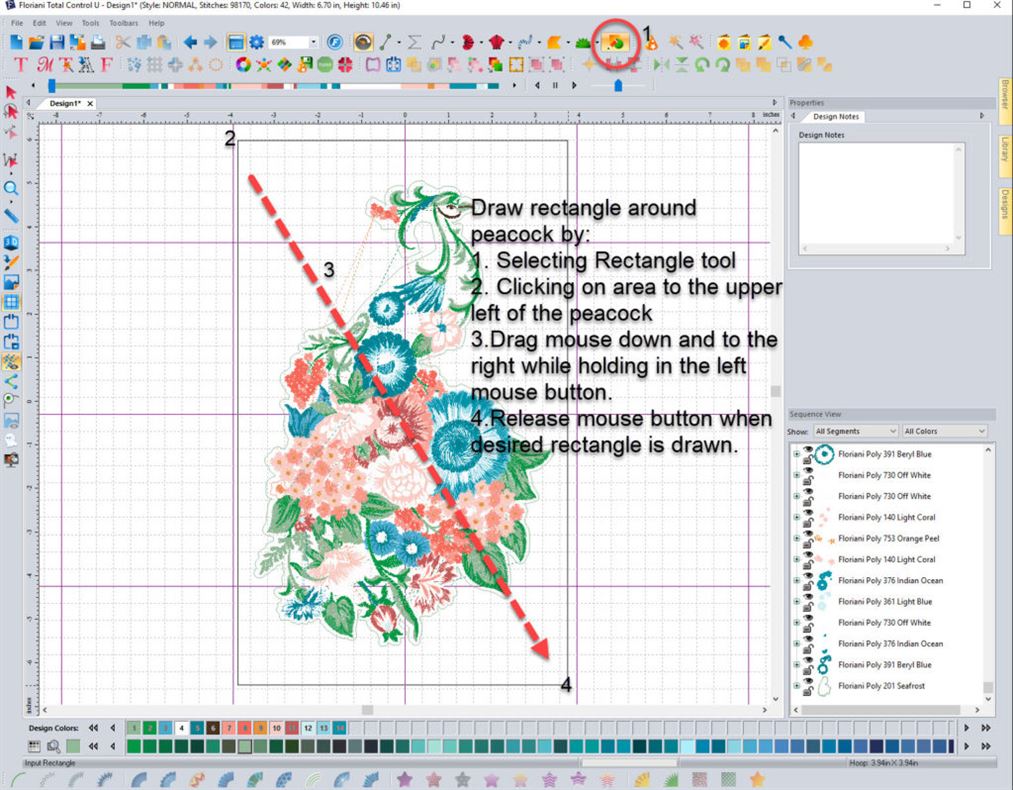
First, you have to add a rectangle (or square) to your design that has the dimensions of the desired block.
To add a rectangle, select the Rectangle from the Custom shapes icon ![]() on the Creation toolbar at the top of the screen.
on the Creation toolbar at the top of the screen.
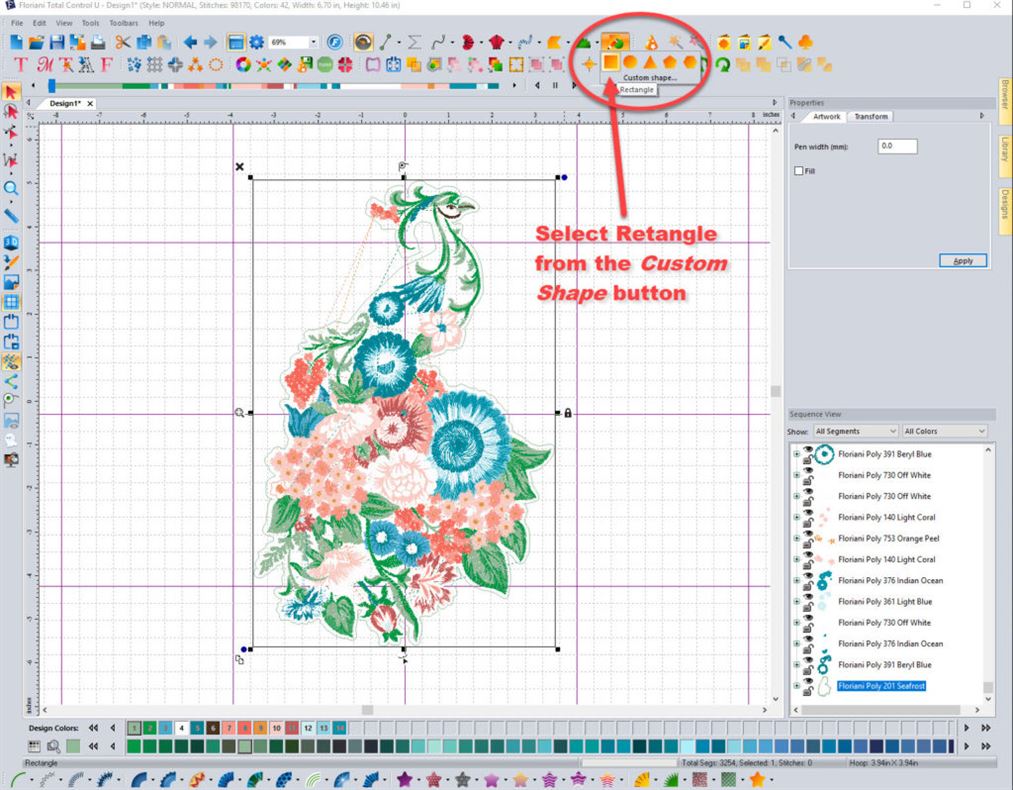
Position your cursor where you want the top left corner of your rectangle. While holding the left mouse button down, draw your cursor down and to the right until you get the approximate size of rectangle that you want. Release the mouse button to complete the rectangle.
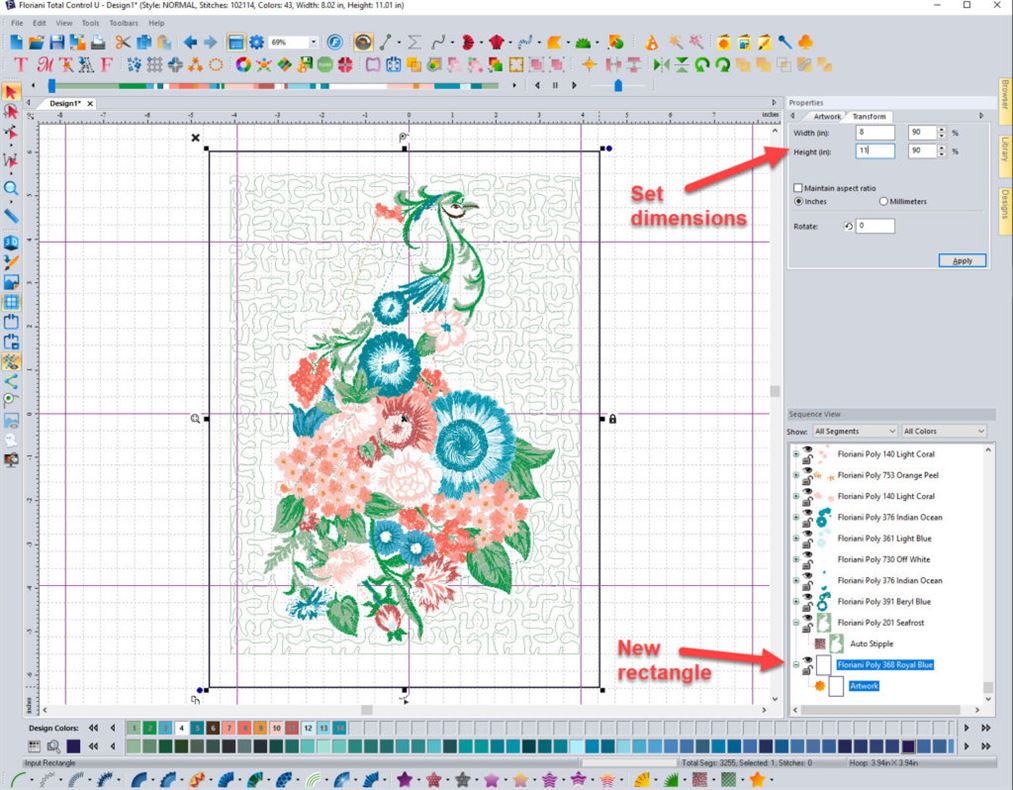
The rectangle is added to the bottom of the thread sequence in the same color sequence as the stippling. Select the rectangle and then select the Transform tab in the Properties section of the screen. (If you do not have that section, go to Toolbars and place a check mark by Properties).
Enter the width and height of your block. Be sure to deselect Maintain aspect ratio so that you can independently change the width and height. (If you are making a square, however, you could leave the Maintain aspect ratio checked.)
Click on Apply to apply the measurements to your rectangle.

Combine Outline and Rectangle
Select the outline sequence and the rectangle you created by holding the CTRL key down while selecting each sequence by a left mouse click.
Once you have the two sequences selected, right click and select Combine from the popup menu. Click on the Paper clip icon ![]() at the top of the screen in the Transform toolbar for the same effect. Either action combines the two sequences.
at the top of the screen in the Transform toolbar for the same effect. Either action combines the two sequences.
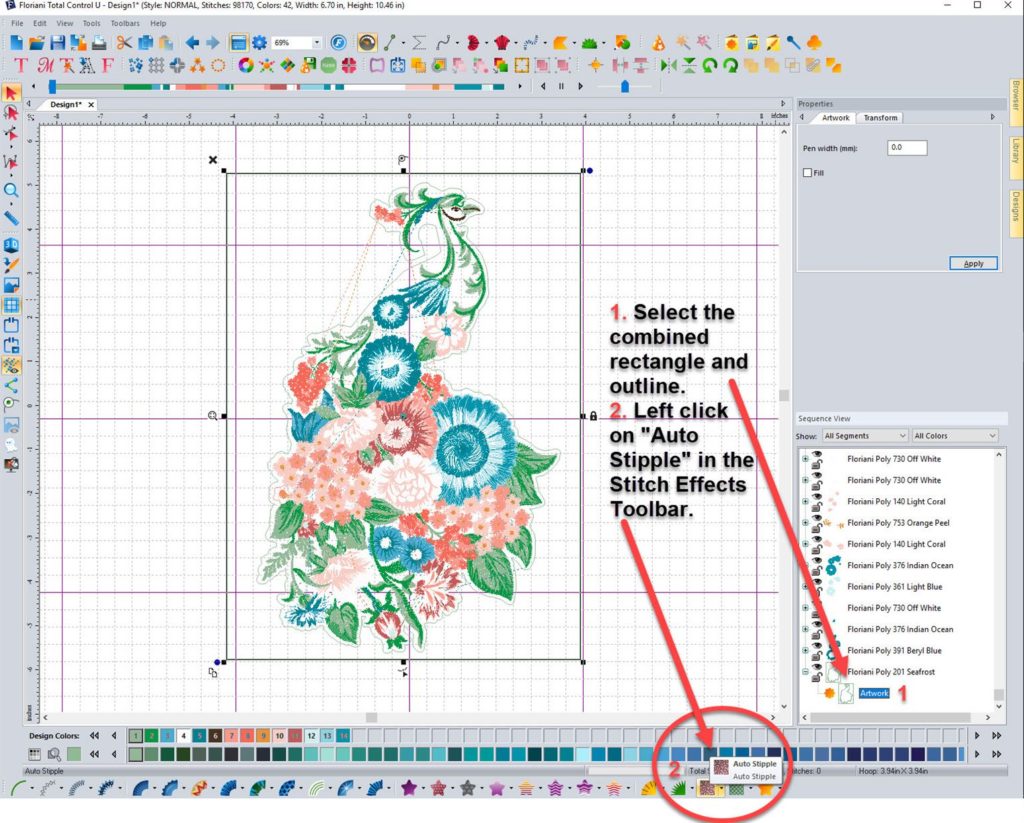
Select the combined sequence and click on the Stipple icon ![]() at the bottom of the screen in the Stitch Effects toolbar.
at the bottom of the screen in the Stitch Effects toolbar.
After a several seconds, the area around the peacock, bounded by the rectangle will be filled with stippling.
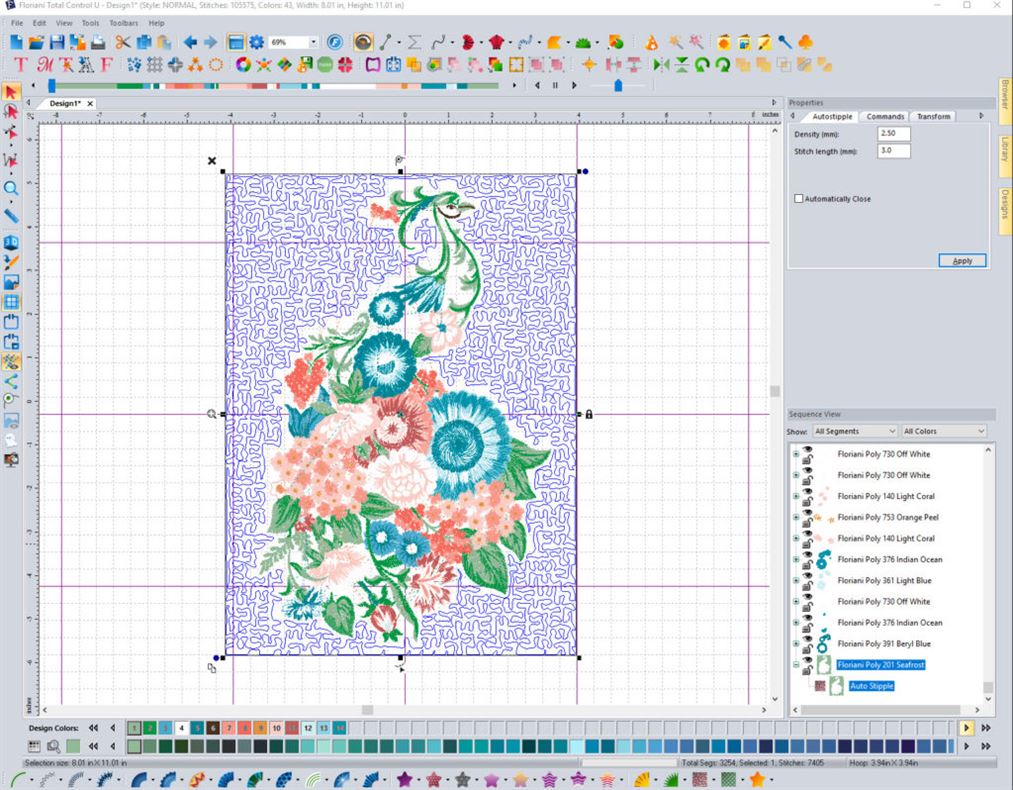
You can change the density and stitch length of the stippling. Select the auto stipple sequence and change the parameters in the Properties section of the screen as desired. I changed the density to 4.0mm and left the stitch length at 3.0mm. Check the box Automatically Close if you want the stippling to have no “loose ends” and no obvious start or stop.

Note: Any of the fills offered in the Stitch Effects toolbar at the bottom of the screen can be used to fill in the space between the rectangle and the peacock. Experiment with some of the fancy fills, changing stitch density to achieve a different effect.
Finalizing the Block
You’ll note that the rectangle that you drew is no longer there. If you want to make a quilt block that has a placement stitch, a batting tackdown stitch and a fabric tackdown stitch, ala Anita Goodesign, simply add rectangles to the design.
Placement Stitch
The first rectangle is the placement stitch. This stitches out on the stabilizer to show where to put the batting. Create this rectangle as before, with the block dimensions (8” x 11” in this example).
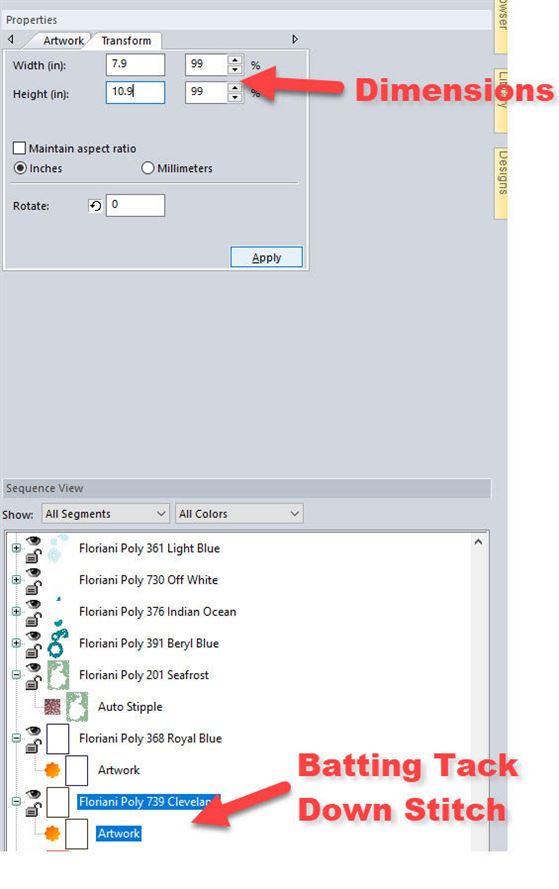
Batting Tack Down Stitch
Create a second rectangle that is slightly smaller than the one above. Use 7.9” and 10.9” for the width and height dimensions for this example. This is the batting tack down stitch. By making it slightly smaller than the block, you can trim the batting close to these stitches and the batting won’t be in the seam when you sew the blocks together.
Fabric Tack Down Stitch
Finally, copy the rectangle that is 8″ x 11″ and paste it into the sequence. This is the fabric tack down stitch.
Sewing Order
You should have three rectangles at the bottom of the Sequence View.
Move the three rectangles to the top of the Sequence View. The easiest way to do this is to select the three rectangles, right click and select Move and then First from the popup menu.

The rectangles you cut from the bottom of the Sequence View are now at the top, ready to be sewn first.
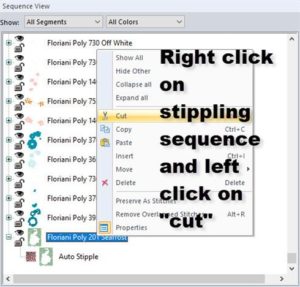
Scroll back to the bottom of the Sequence View and select the stippling sequence. Right click and select Cut.
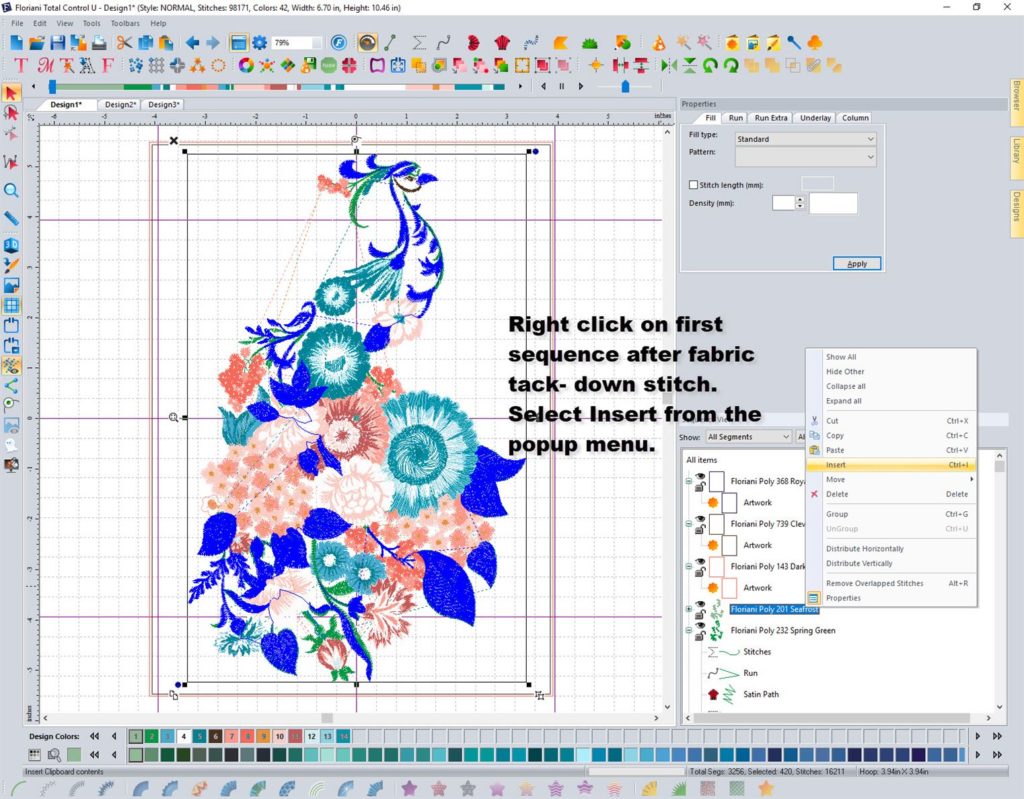
Scroll back to the top, select the 4th item in the Sequence View (after the three rectangles) and right click. Select Paste. Now the stippling is ready to be sewn after the rectangles but before the peacock.
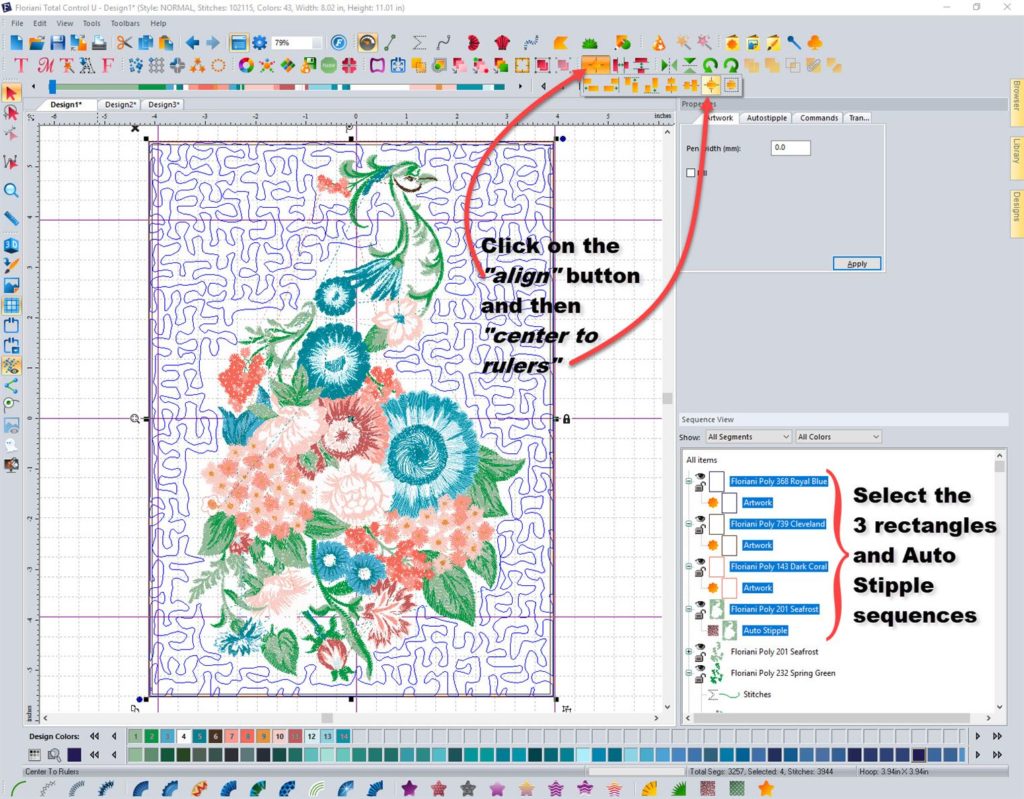
Alignment
Align the three rectangles and the stippling so that they are centered horizontally and vertically with respect to one another. Simply multi select (hold down the CTRL key to multi select) the items and click on the Align icon ![]() in the Align and Distribute toolbar, and then select the Center to Rulers icon
in the Align and Distribute toolbar, and then select the Center to Rulers icon![]() . This centers these items both horizontally and vertically with respect to one another.
. This centers these items both horizontally and vertically with respect to one another.
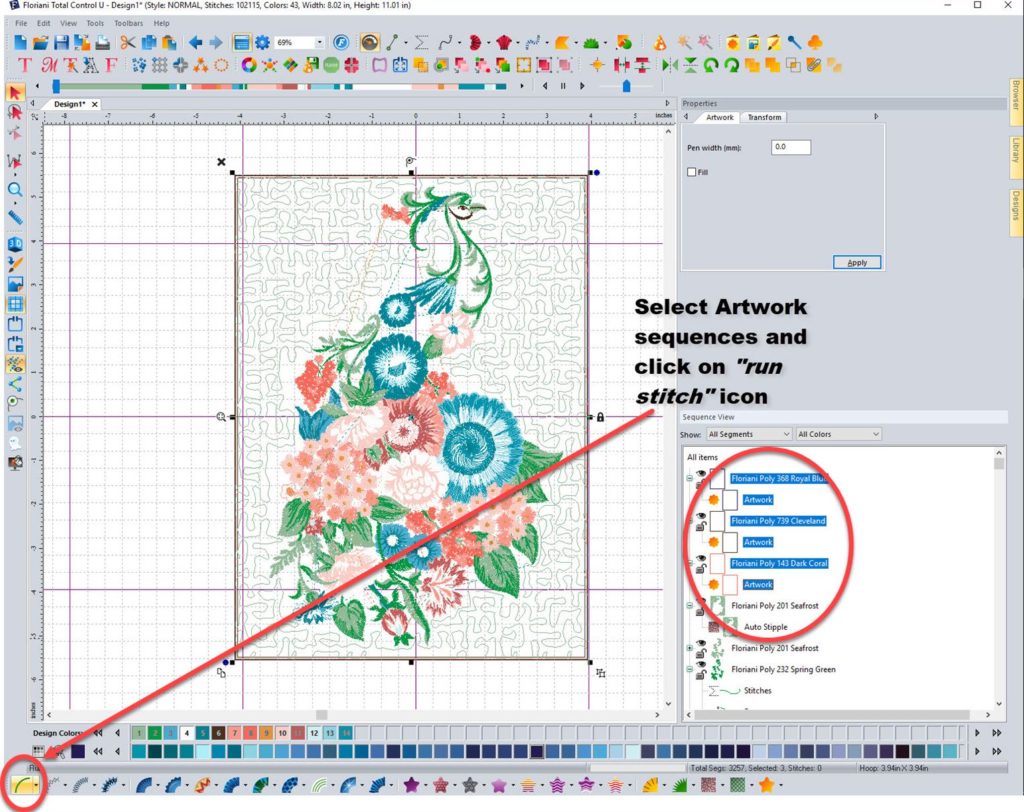
The three rectangles are still “art work” so multi-select them and click on the Run Stitch icon ![]() at the bottom of the screen in the Stitch Effects toolbar.
at the bottom of the screen in the Stitch Effects toolbar.

Your design is ready to save. Give your design a name and save it either as a “.waf” file for further editing or as a stitch file in the format appropriate for your machine.
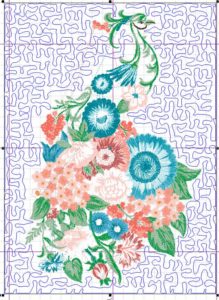
With this technique you can make your own quilt blocks with any embroidery design, and then add stippling around the design at a distance and density of your choosing.
Classes
Want to learn more about Floriani’s FTC-U? Take one of the classes offered at our stores. Check out the class calendar for dates and times.
Comments
Dusty
Wonderful tutorial. I’ve had Floriani software for years but was away from it during some of the upgrades the past few years. Near impossible to understand their online manual. this was so clear and just what I needed.
Cathy Ellsaesser
So glad it helped! I appreciate your letting me know. Happy sewing.
Dave Blackhurst, AZ
Thank You for your good work. I was having trouble with this and you solved my problem.
Cathy Ellsaesser
Thank you for your comment. I appreciate it and am glad you found the blog helpful.
Sherry
Very nice tutorial! Very detailed, thorough, clear, and easy to understand. Thank you.
Cathy Ellsaesser
So glad you enjoyed it. Thanks for the feedback!
Embcart
This embroidery design making article was really helpful for me. thanks a lot for sharing this awesome article with us.